Make a Simple Calculator using HTML, CSS and JS with Source Code

Introduction:
This is the Project which creates a Scientific calculator which helps you to make calculations in math in a very easy manner. It is user-friendly as well as a faster calculator You can use this calculator not only for general use but also for your studies too. The logic used to create this project was not too difficult One who has a basic understanding of JavaScript and familiar with JS Functions concepts can understand in an easy manner. You can customize this project’s animation as well as logic as per requirement.
It’s one of the major projects you can use for your personal use as well as to present in your college.
Explanation:
This project consists of 3 web stacks that are HTML5, CSS3, and JavaScript(ES6). The role of JavaScript plays a very essential role for the logic implied in the code of this code. All the onclick events and conditions are managed as per the user’s use by JavaScript Logic. So let us take a look at how the Logic is built behind the code of this project:
First of all, we have declared 3 constant variables that are const calculator , const display , const buttons these are used later in the code to access the elements in the HTML document by the querySelector methods.
Source Code:
index.html (HTML)
<!DOCTYPE html>
<html>
<head>
<meta charset="UTF-8">
<title>CALCULATOR</title>
<link data-asynced="1" as="style" onload="this.onload=null;this.rel='stylesheet'" rel="preload" type="text/css" href="style.css">
</head>
<body>
<div id="calculator">
<div class="display">0</div>
<div class="buttons">
<button class="operator" value="clear">C</button>
<button class="operator" value="backspace">←</button>
<button class="operator" value="%">%</button>
<button class="operator" value="/">÷</button>
<button value="7">7</button>
<button value="8">8</button>
<button value="9">9</button>
<button class="operator" value="*">×</button>
<button value="4">4</button>
<button value="5">5</button>
<button value="6">6</button>
<button class="operator" value="-">-</button>
<button value="1">1</button>
<button value="2">2</button>
<button value="3">3</button>
<button class="operator" value="+">+</button>
<button class="operator" value="+/-">±</button>
<button value="0">0</button>
<button class="operator" value=".">.</button>
<button class="operator" value="=">=</button>
</div>
</div> <script data-no-optimize="1">!function(t,e){"object"==typeof exports&&"undefined"!=typeof module?module.exports=e():"function"==typeof define&&define.amd?define(e):(t="undefined"!=typeof globalThis?globalThis:t||self).LazyLoad=e()}(this,function(){"use strict";function e(){return(e=Object.assign||function(t){for(var e=1;e<arguments.length;e++){var n,a=arguments[e];for(n in a)Object.prototype.hasOwnProperty.call(a,n)&&(t[n]=a[n])}return t}).apply(this,arguments)}function i(t){return e({},it,t)}function o(t,e){var n,a="LazyLoad::Initialized",i=new t(e);try{n=new CustomEvent(a,{detail:{instance:i}})}catch(t){(n=document.createEvent("CustomEvent")).initCustomEvent(a,!1,!1,{instance:i})}window.dispatchEvent(n)}function l(t,e){return t.getAttribute(gt+e)}function c(t){return l(t,bt)}function s(t,e){return function(t,e,n){e=gt+e;null!==n?t.setAttribute(e,n):t.removeAttribute(e)}(t,bt,e)}function r(t){return s(t,null),0}function u(t){return null===c(t)}function d(t){return c(t)===vt}function f(t,e,n,a){t&&(void 0===a?void 0===n?t(e):t(e,n):t(e,n,a))}function _(t,e){nt?t.classList.add(e):t.className+=(t.className?" ":"")+e}function v(t,e){nt?t.classList.remove(e):t.className=t.className.replace(new RegExp("(^|\\s+)"+e+"(\\s+|$)")," ").replace(/^\s+/,"").replace(/\s+$/,"")}function g(t){return t.llTempImage}function b(t,e){!e||(e=e._observer)&&e.unobserve(t)}function p(t,e){t&&(t.loadingCount+=e)}function h(t,e){t&&(t.toLoadCount=e)}function n(t){for(var e,n=[],a=0;e=t.children[a];a+=1)"SOURCE"===e.tagName&&n.push(e);return n}function m(t,e){(t=t.parentNode)&&"PICTURE"===t.tagName&&n(t).forEach(e)}function a(t,e){n(t).forEach(e)}function E(t){return!!t[st]}function I(t){return t[st]}function y(t){return delete t[st]}function A(e,t){var n;E(e)||(n={},t.forEach(function(t){n[t]=e.getAttribute(t)}),e[st]=n)}function k(a,t){var i;E(a)&&(i=I(a),t.forEach(function(t){var e,n;e=a,(t=i[n=t])?e.setAttribute(n,t):e.removeAttribute(n)}))}function L(t,e,n){_(t,e.class_loading),s(t,ut),n&&(p(n,1),f(e.callback_loading,t,n))}function w(t,e,n){n&&t.setAttribute(e,n)}function x(t,e){w(t,ct,l(t,e.data_sizes)),w(t,rt,l(t,e.data_srcset)),w(t,ot,l(t,e.data_src))}function O(t,e,n){var a=l(t,e.data_bg_multi),i=l(t,e.data_bg_multi_hidpi);(a=at&&i?i:a)&&(t.style.backgroundImage=a,n=n,_(t=t,(e=e).class_applied),s(t,ft),n&&(e.unobserve_completed&&b(t,e),f(e.callback_applied,t,n)))}function N(t,e){!e||0<e.loadingCount||0<e.toLoadCount||f(t.callback_finish,e)}function C(t,e,n){t.addEventListener(e,n),t.llEvLisnrs[e]=n}function M(t){return!!t.llEvLisnrs}function z(t){if(M(t)){var e,n,a=t.llEvLisnrs;for(e in a){var i=a[e];n=e,i=i,t.removeEventListener(n,i)}delete t.llEvLisnrs}}function R(t,e,n){var a;delete t.llTempImage,p(n,-1),(a=n)&&--a.toLoadCount,v(t,e.class_loading),e.unobserve_completed&&b(t,n)}function T(o,r,c){var l=g(o)||o;M(l)||function(t,e,n){M(t)||(t.llEvLisnrs={});var a="VIDEO"===t.tagName?"loadeddata":"load";C(t,a,e),C(t,"error",n)}(l,function(t){var e,n,a,i;n=r,a=c,i=d(e=o),R(e,n,a),_(e,n.class_loaded),s(e,dt),f(n.callback_loaded,e,a),i||N(n,a),z(l)},function(t){var e,n,a,i;n=r,a=c,i=d(e=o),R(e,n,a),_(e,n.class_error),s(e,_t),f(n.callback_error,e,a),i||N(n,a),z(l)})}function G(t,e,n){var a,i,o,r,c;t.llTempImage=document.createElement("IMG"),T(t,e,n),E(c=t)||(c[st]={backgroundImage:c.style.backgroundImage}),o=n,r=l(a=t,(i=e).data_bg),c=l(a,i.data_bg_hidpi),(r=at&&c?c:r)&&(a.style.backgroundImage='url("'.concat(r,'")'),g(a).setAttribute(ot,r),L(a,i,o)),O(t,e,n)}function D(t,e,n){var a;T(t,e,n),a=e,e=n,(t=It[(n=t).tagName])&&(t(n,a),L(n,a,e))}function V(t,e,n){var a;a=t,(-1<yt.indexOf(a.tagName)?D:G)(t,e,n)}function F(t,e,n){var a;t.setAttribute("loading","lazy"),T(t,e,n),a=e,(e=It[(n=t).tagName])&&e(n,a),s(t,vt)}function j(t){t.removeAttribute(ot),t.removeAttribute(rt),t.removeAttribute(ct)}function P(t){m(t,function(t){k(t,Et)}),k(t,Et)}function S(t){var e;(e=At[t.tagName])?e(t):E(e=t)&&(t=I(e),e.style.backgroundImage=t.backgroundImage)}function U(t,e){var n;S(t),n=e,u(e=t)||d(e)||(v(e,n.class_entered),v(e,n.class_exited),v(e,n.class_applied),v(e,n.class_loading),v(e,n.class_loaded),v(e,n.class_error)),r(t),y(t)}function $(t,e,n,a){var i;n.cancel_on_exit&&(c(t)!==ut||"IMG"===t.tagName&&(z(t),m(i=t,function(t){j(t)}),j(i),P(t),v(t,n.class_loading),p(a,-1),r(t),f(n.callback_cancel,t,e,a)))}function q(t,e,n,a){var i,o,r=(o=t,0<=pt.indexOf(c(o)));s(t,"entered"),_(t,n.class_entered),v(t,n.class_exited),i=t,o=a,n.unobserve_entered&&b(i,o),f(n.callback_enter,t,e,a),r||V(t,n,a)}function H(t){return t.use_native&&"loading"in HTMLImageElement.prototype}function B(t,i,o){t.forEach(function(t){return(a=t).isIntersecting||0<a.intersectionRatio?q(t.target,t,i,o):(e=t.target,n=t,a=i,t=o,void(u(e)||(_(e,a.class_exited),$(e,n,a,t),f(a.callback_exit,e,n,t))));var e,n,a})}function J(e,n){var t;et&&!H(e)&&(n._observer=new IntersectionObserver(function(t){B(t,e,n)},{root:(t=e).container===document?null:t.container,rootMargin:t.thresholds||t.threshold+"px"}))}function K(t){return Array.prototype.slice.call(t)}function Q(t){return t.container.querySelectorAll(t.elements_selector)}function W(t){return c(t)===_t}function X(t,e){return e=t||Q(e),K(e).filter(u)}function Y(e,t){var n;(n=Q(e),K(n).filter(W)).forEach(function(t){v(t,e.class_error),r(t)}),t.update()}function t(t,e){var n,a,t=i(t);this._settings=t,this.loadingCount=0,J(t,this),n=t,a=this,Z&&window.addEventListener("online",function(){Y(n,a)}),this.update(e)}var Z="undefined"!=typeof window,tt=Z&&!("onscroll"in window)||"undefined"!=typeof navigator&&/(gle|ing|ro)bot|crawl|spider/i.test(navigator.userAgent),et=Z&&"IntersectionObserver"in window,nt=Z&&"classList"in document.createElement("p"),at=Z&&1<window.devicePixelRatio,it={elements_selector:".lazy",container:tt||Z?document:null,threshold:300,thresholds:null,data_src:"src",data_srcset:"srcset",data_sizes:"sizes",data_bg:"bg",data_bg_hidpi:"bg-hidpi",data_bg_multi:"bg-multi",data_bg_multi_hidpi:"bg-multi-hidpi",data_poster:"poster",class_applied:"applied",class_loading:"litespeed-loading",class_loaded:"litespeed-loaded",class_error:"error",class_entered:"entered",class_exited:"exited",unobserve_completed:!0,unobserve_entered:!1,cancel_on_exit:!0,callback_enter:null,callback_exit:null,callback_applied:null,callback_loading:null,callback_loaded:null,callback_error:null,callback_finish:null,callback_cancel:null,use_native:!1},ot="src",rt="srcset",ct="sizes",lt="poster",st="llOriginalAttrs",ut="loading",dt="loaded",ft="applied",_t="error",vt="native",gt="data-",bt="ll-status",pt=[ut,dt,ft,_t],ht=[ot],mt=[ot,lt],Et=[ot,rt,ct],It={IMG:function(t,e){m(t,function(t){A(t,Et),x(t,e)}),A(t,Et),x(t,e)},IFRAME:function(t,e){A(t,ht),w(t,ot,l(t,e.data_src))},VIDEO:function(t,e){a(t,function(t){A(t,ht),w(t,ot,l(t,e.data_src))}),A(t,mt),w(t,lt,l(t,e.data_poster)),w(t,ot,l(t,e.data_src)),t.load()}},yt=["IMG","IFRAME","VIDEO"],At={IMG:P,IFRAME:function(t){k(t,ht)},VIDEO:function(t){a(t,function(t){k(t,ht)}),k(t,mt),t.load()}},kt=["IMG","IFRAME","VIDEO"];return t.prototype={update:function(t){var e,n,a,i=this._settings,o=X(t,i);{if(h(this,o.length),!tt&&et)return H(i)?(e=i,n=this,o.forEach(function(t){-1!==kt.indexOf(t.tagName)&&F(t,e,n)}),void h(n,0)):(t=this._observer,i=o,t.disconnect(),a=t,void i.forEach(function(t){a.observe(t)}));this.loadAll(o)}},destroy:function(){this._observer&&this._observer.disconnect(),Q(this._settings).forEach(function(t){y(t)}),delete this._observer,delete this._settings,delete this.loadingCount,delete this.toLoadCount},loadAll:function(t){var e=this,n=this._settings;X(t,n).forEach(function(t){b(t,e),V(t,n,e)})},restoreAll:function(){var e=this._settings;Q(e).forEach(function(t){U(t,e)})}},t.load=function(t,e){e=i(e);V(t,e)},t.resetStatus=function(t){r(t)},Z&&function(t,e){if(e)if(e.length)for(var n,a=0;n=e[a];a+=1)o(t,n);else o(t,e)}(t,window.lazyLoadOptions),t});!function(e,t){"use strict";function a(){t.body.classList.add("litespeed_lazyloaded")}function n(){console.log("[LiteSpeed] Start Lazy Load Images"),d=new LazyLoad({elements_selector:"[data-lazyloaded]",callback_finish:a}),o=function(){d.update()},e.MutationObserver&&new MutationObserver(o).observe(t.documentElement,{childList:!0,subtree:!0,attributes:!0})}var d,o;e.addEventListener?e.addEventListener("load",n,!1):e.attachEvent("onload",n)}(window,document);</script><script data-no-optimize="1">var litespeed_vary=document.cookie.replace(/(?:(?:^|.*;\s*)_lscache_vary\s*\=\s*([^;]*).*$)|^.*$/,"");litespeed_vary||fetch("/wp-content/plugins/litespeed-cache/guest.vary.php",{method:"POST",cache:"no-cache",redirect:"follow"}).then(e=>e.json()).then(e=>{console.log(e),e.hasOwnProperty("reload")&&"yes"==e.reload&&(sessionStorage.setItem("litespeed_docref",document.referrer),window.location.reload(!0))});</script><script data-optimized="1" type="litespeed/javascript" data-src="https://codewithcurious.com/wp-content/litespeed/js/498f68a5eb4ec694db8478345e6b6a23.js?ver=299cf"></script><script>const litespeed_ui_events=["mouseover","click","keydown","wheel","touchmove","touchstart"];var urlCreator=window.URL||window.webkitURL;function litespeed_load_delayed_js_force(){console.log("[LiteSpeed] Start Load JS Delayed"),litespeed_ui_events.forEach(e=>{window.removeEventListener(e,litespeed_load_delayed_js_force,{passive:!0})}),document.querySelectorAll("iframe[data-litespeed-src]").forEach(e=>{e.setAttribute("src",e.getAttribute("data-litespeed-src"))}),"loading"==document.readyState?window.addEventListener("DOMContentLoaded",litespeed_load_delayed_js):litespeed_load_delayed_js()}litespeed_ui_events.forEach(e=>{window.addEventListener(e,litespeed_load_delayed_js_force,{passive:!0})});async function litespeed_load_delayed_js(){let t=[];for(var d in document.querySelectorAll('script[type="litespeed/javascript"]').forEach(e=>{t.push(e)}),t)await new Promise(e=>litespeed_load_one(t[d],e));document.dispatchEvent(new Event("DOMContentLiteSpeedLoaded")),window.dispatchEvent(new Event("DOMContentLiteSpeedLoaded"))}function litespeed_load_one(t,e){console.log("[LiteSpeed] Load ",t);var d=document.createElement("script");d.addEventListener("load",e),d.addEventListener("error",e),t.getAttributeNames().forEach(e=>{"type"!=e&&d.setAttribute("data-src"==e?"src":e,t.getAttribute(e))});let a=!(d.type="text/javascript");!d.src&&t.textContent&&(d.src=litespeed_inline2src(t.textContent),a=!0),t.after(d),t.remove(),a&&e()}function litespeed_inline2src(t){try{var d=urlCreator.createObjectURL(new Blob([t.replace(/^(?:<!--)?(.*?)(?:-->)?$/gm,"$1")],{type:"text/javascript"}))}catch(e){d="data:text/javascript;base64,"+btoa(t.replace(/^(?:<!--)?(.*?)(?:-->)?$/gm,"$1"))}return d}</script></body> <script type="litespeed/javascript" data-src="script.js"></script> </html>
style.css ( CSS )
					body{
  background-color: #c0d3cf;
}

#calculator {
    width: 400px;
    height: 570px;
    margin: 100px auto;
    background-color: #797373;
    color: #fff;
    border-radius: 10px;
    border-radius: 20px;
    box-shadow: 10px 10px 15px .1px black;
  }

  .display {
    width: 100%;
    height: 80px;
    background-color: #4e5a49;
    font-size: 36px;
    text-align: right;
    padding: 20px;
    box-sizing: border-box;
   border-top-right-radius: 20px;
   border-top-left-radius: 20px;
   font-weight: bolder;
   font-family: cursive;
  }

  .buttons {
    display: grid;
    grid-template-columns: repeat(4, 1fr);
    grid-gap: 20px;
    padding: 20px;
  }

  button {
    width: 100%;
    height: 70px;
    font-size: 24px;
    background-color: #fff;
    color: #333;
    border-radius: 5px;
    border: none;
    cursor: pointer;
    filter: drop-shadow(10px 10px 10px rgb(19, 24, 19));
    font-weight: bolder;
  }
  button:hover{
    transform: scale(1.05);
  }

  .operator {
    background-color: #f39c12;
    color: #fff;
  }
script.js (JavaScript )
					const calculator = document.querySelector("#calculator");
const display = calculator.querySelector(".display");
const buttons = calculator.querySelectorAll("button");

buttons.forEach(button => {
  button.addEventListener("click", function() {
    let value = this.value;
    let text = display.textContent.trim();
    if (value === "clear") {
      display.textContent = "0";
    } else if (value === "backspace") {
      display.textContent = text.substring(0, text.length - 1);
    } else if (value === "=") {
      display.textContent = eval(text);
    } else if (value === "+/-") {
      display.textContent = text.startsWith("-") ? text.substring(1) : `-${text}`;
    } else {
      display.textContent = text === "0" ? value : text + value;
    }
  });
});
Let us discuss the work of these 3 constants one by one :
const calculator:
In this constant variable we have written document.querySelector(“#calculator”); This code has important logic to selects the HTML element with the class display inside the calculator element and assigns it to the display constant variable.
const display:
The second constant we have declared is const display .
We have declared it with calculator.querySelector(“.display”); which the HTML element with the class display inside the calculator element and assigns it to the display constant variable.
This is the code which help user to enter the numbers in calculator.
const buttons:
The button we have created in the calculator are the part of this code that is calculator.querySelectorAll(“button”); It is declared to slect all the buttons elements inside of calculator elements and assign them to the buttons constant variables
So these are the 3 constants we have declared in this code
Now we discuss the functions of this codes:
First function we have created Is buttons.forEach(button => { … });
This is created t use forEach method to loop from each button element in the button array
For each button, an event listener is formed using the method addEventListener..
whenever the button is clicked. The event listener access the click event and executes the anonymous function defined inside it.
The second function we have made is if (value === “clear”) { … } this function has the ability to invoke as per the conditions given in the if statements as per the on click events.
If we click the button which has ‘clear’ then this code sets the text to ‘zero’
We have created some functions under the condition as per the click events & user inputs from that here is a function named (value === “backspace”) { … }
This function is created to remove the last character from the text content of the display element If and only if the clicked button has a value of “backspace”,
Another conditional function is (value === “=”) { … }:
When we click the button which has a value of “=” then this code executes the expression represented by the text content of the display element and sets the result as the text content of the display element.
The function (value === “+/-“) { … } has also the condition of invoking this function executes its code if the user clicks the button of ‘+ or –‘
if the text content of the display element starts with a “-“ the block of this function’s code removes it from display element
And from all of these conditional functions if any function does not satisfy any conditions the last block of code executes its code.
It sets the text content of the display element to the value of the clicked button.
the text content is replaced by the value of the clicked button If the text content of the display element was “0”
and the value of the clicked button is concatenated to the end of the text content. If the text content of the display element wasn’t “0”.
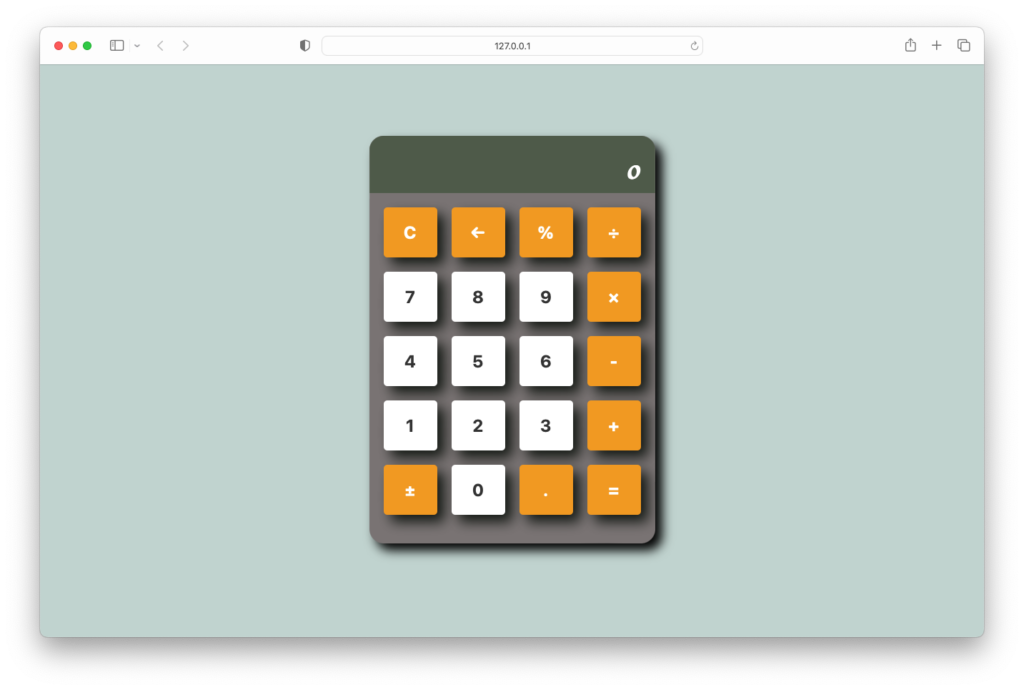
Output :

More HTML CSS JS Projects
Get Huge Discounts
Get Discount on Top EdTech Compnies
Find More Projects
Build a Quiz Game Using HTML CSS and JavaScript Introduction Hello coders, you might have played various games, but were you aware …
Emoji Catcher Game Using HTML CSS and JavaScript Introduction Hello Coders, Welcome to another new blog. In this article we’ve made a …
Typing Challenge Using HTML CSS and JavaScript Introduction Hello friends, all you developer friends are welcome to our new project. If you …
Breakout Game Using HTML CSS and JavaScript With Source Code Introduction Hello friends, welcome to today’s new blog post. All of you …
Digital and Analog Clock using HTML CSS and JavaScript Introduction : This project is a digital clock and stopwatch system, which allows …
Coffee Shop Website using HTML, CSS & JavaScript Introduction : This project is a website for coffee house business. It uses HTML …


