
Warp Perspective Using Open CV Python
Introduction:
In this article, we are going to see how to Create a Warp Perspective System Using Python .
As we know OpenCV is a widely used library for image processing. It provides a wide sense of image processing. Let’s see how to create a Warp Perspective System using OpenCV . Also, check the path before running the code otherwise you will be full with errors.
Warp Perspective allows for the transformation of images by altering their perspective . This System is used for image stitching , correction of lens distortions and creating panoramic views . Python is Right option to make this system because it contains a powerful library named as Open CV , which provides the tools for image manipulation . Warp Perspective involves mapping points from one image plane to another by a transformation matrix . This matrix defines that how the coordinates of the original image are adjusted to fit a new perspective .
Required Modules Or Packages:
1. Cv2: It is a Library to use in Computer Vision Task . You will get basic image processing tools while using cv2 like Image Reading and writing .
2. Numpy: It is a core library for numerical computation in python and it can handle large arrays of numbers .
How To Run The Code:
Step 1 . First , You Download and Install Visual Studio Code or VS Code In your PC or Laptop by VS Code Official Website .
Step 2 . Now Open CMD As Administrator and install the above packages using Pip .
Step 3 . Now Open Visual Studio Code .
Step 4. Now Make The file named as main.py .
Step 5 . Now Copy And Paste The Code from the Link Given Below
Step 6 . After pasting The Code , Save This & Click On Run Button .
Step 7 . Now You will See The Output .
Code Explanation:
This Python code is used to Create a Warp Perspective System . Ensures that You Have Downloaded the modules given above .
Imports:
import cv2
import numpy as np
• Cv2: It is a Library to use in Computer Vision Task . You will get basic image processing tools while using cv2 like Image Reading and writing .
• Numpy: It is a core library for numerical computation in python and it can handle large arrays of numbers .
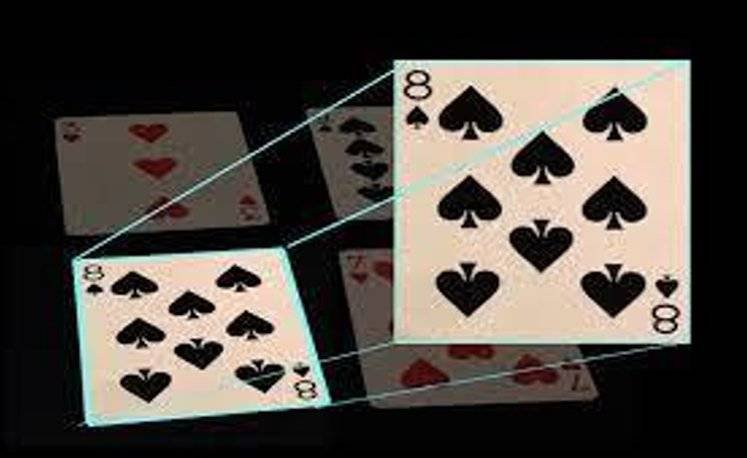
Read the Image:
img = cv2.imread(‘Resources/cards.jpg’)
This line reads the image from the written path and stores it in the img variable .
Define Dimensions and Points:
width, height = 250, 350
pts1 = np.float32([[111, 219], [287, 188], [154, 482], [352, 440]])
pts2 = np.float32([[0, 0], [width, 0], [0, height], [width, height]])
Width and Height specify the dimensions of the output image which is perspective image .
Pts1: It contains 4 points from the original image which is you want to transform .
Pts2: It defines the coordinates of where you want these 4 points to map in the output image . It specifies the rectangle with the dimensions .
Compute the Perspective Transformation Matrix:
matrix = cv2.getPerspectiveTransform(pts1, pts2)
cv2.getPerspectiveTransform: This function calculates the homography matrix which maps the points from pts1 and pts2 .
Apply the Perspective Warp:
imgOutput = cv2.warpPerspective(img, matrix, (width, height))
cv2.warpPerspective: It uses the computed matrix to transform the perspective of img , it produce the output image (imgOutput) with the specified dimensions .
Draw Circles on Points in the Original Image:
for x in range(0, 4):
cv2.circle(img, (int(pts1[x][0]), int(pts1[x][1])), 15, (0, 255, 0),
cv2.FILLED)
This loop draws the green circles at each 4 points which is specified in pts1 on original image.
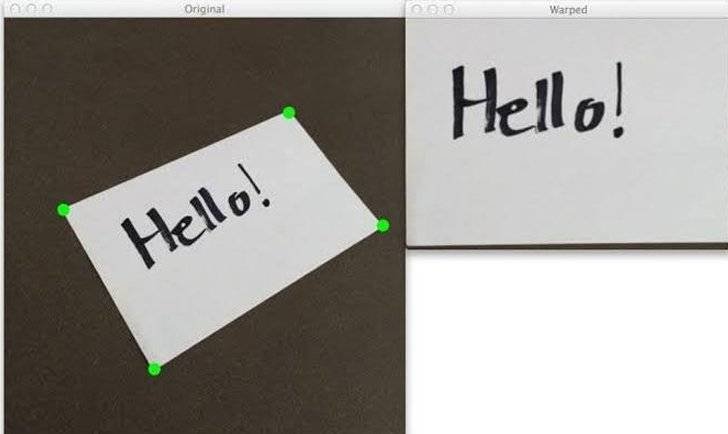
Display the Images:
cv2.imshow(“Original Image”, img)
cv2.imshow(“Output Image”, imgOutput)
cv2.waitKey(0)
cv2.imshow: It displays the original image and warped output image in separate windows .
cv2.waitKey(0): It waits for a key press to close the image windows .
Source Code:
					import cv2
import numpy as np

img = cv2.imread('Resources/cards.jpg')

width, height = 250,350
pts1 = np.float32([[111,219],[287,188],[154,482],[352,440]])
pts2 = np.float32([[0,0],[width,0],[0,height],[width,height]])
matrix = cv2.getPerspectiveTransform(pts1,pts2)
imgOutput = cv2.warpPerspective(img,matrix,(width,height))

for x in range (0,4):
    cv2.circle(img,(pts1[x][0],pts1[x][1]),15,(0,255,0),cv2.FILLED)

cv2.imshow("Original Image ", img)
cv2.imshow("Output Image ", imgOutput)
cv2.waitKey(0)
Output:
Get Huge Discounts

More Python Projects
