
AI Virtual Painter Using Python using OpenCV with Python GUI

Introduction:
The way we interact with technology is being completely transformed by artificial intelligence (AI), which makes machines more responsive, intuitive, and able to carry out tasks that previously required human labor. Digital painting and drawing are two examples of creative AI applications. Painting can now be simulated virtually without the use of actual tools thanks to advancements in computer vision and hand-tracking technologies. This blog post will introduce you to an exciting project I worked on: a Python-based AI virtual painter. An inventive tool that converts hand gestures into brush strokes on a digital canvas is the AI Virtual Painter.
This app uses computer vision and machine learning techniques to let users use their webcam to draw, paint, and interact with a virtual canvas. For artists, kids, or anyone else wishing to explore creativity in a fun and futuristic way, it’s ideal because it offers an immersive, hands-free digital drawing experience.
Purpose And Functionality:
The AI Virtual Painter’s main goal is to offer a user-friendly, interactive platform for creating digital art with hand gestures. In addition to making drawing more interesting, this exposes users to real-world AI applications in artistic fields.
Python is the main tool used in this project, along with potent tools for image processing OpenCV and real-time hand tracking Mediapipe. The system tracks finger movements and detects hand landmarks to ascertain user intentions—that of drawing, erasing, color changing, or screen clearing. Using two fingers could indicate a “draw” mode, for example; showing just one finger would signal “selection” mode.
Real-time Mediapipe library identification of key points on the user’s hand upon camera capture These points are then examined in order to ascertain the user’s gestures. These motions indicate which mode the application moves between—color selection, drawing on the canvas, or erasing past strokes. Users of the responsive and interactive virtual canvas can create art organically and naturally as well as logically.
Key Features:
The AI Virtual Painter boasts some particularly remarkable qualities including: Using Mediapipe, accurate real-time identification of hand landmarks. Using index finger movement, users can draw or paint without a mouse or touchscreen required. Through gesture-activated menus, users can move between several colors. An eraser mode is triggered by a particular hand motion to either fix or eliminate portions of the drawing. Virtual Toolbar: To improve usability, on-screen toolbar lets users select tools, colors, and clean the canvas. Designed to run seamlessly on standard hardware, optimized real-time performance preserves a high frame rate for fluid interaction.
Required Modules Or Packages:
- Cv2 : It is a Library to use in Computer Vision Task . You will get basic image processing tools while using cv2 like Image Reading and writing .
- Numpy : It is a core library for numerical computation in python and it can handle large arrays of numbers .
- Mediapipe : Google’s cross-platform library allows real-time computer vision applications including face detection and hand tracking to be developed.
- Os : A standard Python library that offers features for working with the operating system, including the ability to manipulate files and directories.
- Math : Trigonometry, logarithms, and constants like pi are all provided by this built-in Python module.
To install these Packages, use the following command:
1. Mediapipe:
pip install mediapipe
2. Numpy:
pip install numpy
3. Cv2:
pip install opencv-python
4. Os and math: These are built-in Python libraries, so you don’t need to install them separately.
Just make sure you’re using Python 3.x, and you can directly import them in your script:
import os
import math
How To Run The Code:
Method 1:
Step 1 . First , You Download and Install Visual Studio Code or VS Code In your PC or Laptop by VS Code Official Website .
Step 2 . Now Open CMD As Administrator and install the above packages using Pip .
Step 3 . Now Open Visual Studio Code .
Step 4. Now Make The file named as main.py .
Step 5 . Now Copy And Paste The Code from the Link Given Below ⬇️
Step 6 . After pasting The Code , Save This & Click On Run Button .
Step 7 . Now You will See The Output .
Method 2:
Step 1 . First , You Download and Install Visual Studio Code or VS Code In your PC or Laptop by VS Code Official Website .
Step 2 . Now Open CMD As Administrator and install the above packages using Pip .
Step 3 . Now Open the link , which is provided below.
Step 4. Now download the ZIP file of the code.
Step 5 . Now Extract the ZIP file and Open in VS Code.
Step 6 . Now go to the main file and click on run button.
Step 7 . Now You will See The Output .
How to Use:
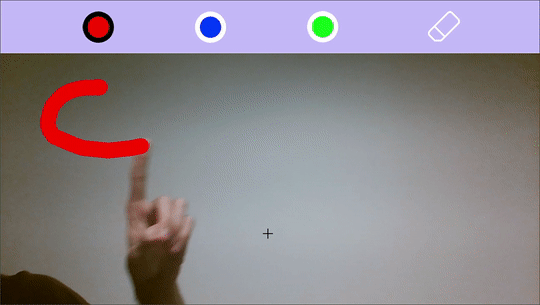
- Use your index and middle finger to activate Selection Mode and choose from various colors or the eraser at the top of the screen.
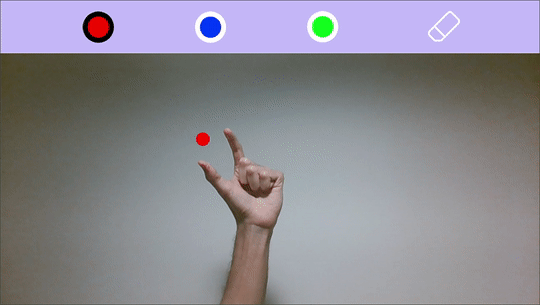
- Adjust the thickness of the draw using the distance between your thumb and index finger, selecting the desired size when the pinky finger is up.
- Clear the screen simply by closing your hand.
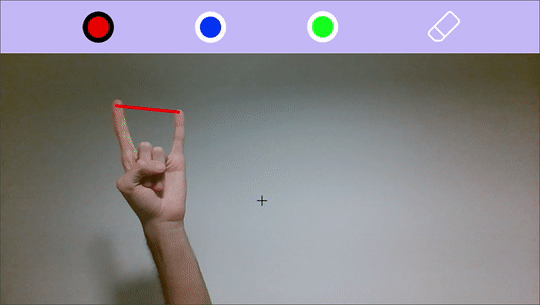
- Enter in Stand by Mode using only your index and pinky finger (indicated by a line between these 2 fingers). This mode is useful when you want to draw separate things on the screen.
Code Explanation:
This Python code is used to Create an AI Virtual Painter. Ensures that You Have Downloaded the modules given above .
Importing Required Libraries:
import cv2
import numpy as np
import mediapipe as mp
import os
import math
- Cv2 : It is a Library to use in Computer Vision Task . You will get basic image processing tools while using cv2 like Image Reading and writing .
It Handles the image processing and camera input.
- Numpy : It is a core library for numerical computation in python and it can handle large arrays of numbers .
It creates and manages the drawing canvas.
- Mediapipe : Google’s cross-platform library allows real-time computer vision applications including face detection and hand tracking to be developed.
It Provides the hand tracking models.
- Os : A standard Python library that offers features for working with the operating system, including the ability to manipulate files and directories.
It helps to load toolbar images.
- Math : Trigonometry, logarithms, and constants like pi are all provided by this built-in Python module.
It Performs the geometric calculations like distance and angles.
Camera Setup and Canvas Initialization :-
cap = cv2.VideoCapture(0, cv2.CAP_DSHOW)
cap.set(cv2.CAP_PROP_FPS, 5)
...
imgCanvas = np.zeros((height, width, 3), np.uint8)
This block of the code will open the webcam , sets resolution and frame rate, and creates a black canvas (imgCanvas) where the drawings are rendered.
Loading Toolbar Images :-
folderPath = 'Hand Tracking Project\\Header'
myList = os.listdir(folderPath)
overlayList = [cv2.imread(f'{folderPath}/{imPath}') for imPath in myList]
This block of the code will loads the header/tool images like color buttons or erasers, which are displayed at the top of screen for interaction.
Hand Tracking with MediaPipe :-
with mp_hands.Hands(...) as hands:
This line will initializes the MediaPipe’s hand-tracking model. Inside the loop, it processes the each video frame to detect hand landmarks.
Finger Detection and Gesture Recognition :-
tipIds = [4, 8, 12, 16, 20]
if points[tipIds[0]][0] < points[tipIds[0] - 1][0]:
fingers.append(1)  # Thumb
It will tracks the tips of each finger and uses their position to determine that if a finger is “up” or “down” by comparing coordinates. Based on the combination, it determines the mode: Draw, Select, Standby, or Thickness Adjustment.
Drawing and Mode Switching :-
- Selection Mode (Two fingers up):
if (fingers[1] and fingers[2]) and all(fingers[i] == 0 for i in nonSel):
Through This line, Users can change colors or choose the eraser by pointing to the specific toolbar areas.
- Draw Mode (Only index finger up):
if fingers[1] and all(fingers[i] == 0 for i in nonDraw):
cv2.line(imgCanvas, (xp, yp), (x1, y1), drawColor, thickness)
This line of the code will Draws lines on the canvas between previous and current finger positions.
- Clear Screen (All fingers down):
if all(fingers[i] == 0 for i in range(0, 5)):
imgCanvas = np.zeros((height, width, 3), np.uint8)
This line of the code will clear the entire screen . All the drawings, which are made on the screen , will clear.
Thickness Adjustment Using Thumb and Index Finger :-
r = int(math.sqrt((x1-x3)**2 + (y1-y3)**2)/3)
...
if fingers[4]: thickness = r
It Calculates the distance between thumb and index to adjust the thickness of line dynamically and confirms it when the pinky is up.
Combining Drawing with Live Feed :-
imgGray = cv2.cvtColor(imgCanvas, cv2.COLOR_BGR2GRAY)
_, imgInv = cv2.threshold(imgGray, 5, 255, cv2.THRESH_BINARY_INV)
img = cv2.bitwise_and(image, imgInv)
img = cv2.bitwise_or(img, imgCanvas)
This line will merges the drawing canvas (imgCanvas) with the live camera feed by masking out the black background .
Display and Exit :-
cv2.imshow('MediaPipe Hands', img)
if cv2.waitKey(3) & 0xFF == ord('q'):
break
This will Displays the final output of the code. Press ‘q’ to exit.
Source Code:
					import cv2
import mediapipe as mp
import numpy as np
import os
import math
mp_drawing = mp.solutions.drawing_utils
mp_hands = mp.solutions.hands

# For webcam input:
cap = cv2.VideoCapture(0, cv2.CAP_DSHOW)
cap.set(cv2.CAP_PROP_FPS, 5)
width = 1280
height = 720
cap.set(3, width)
cap.set(4, height)

# Image that will contain the drawing and then passed to the camera image
imgCanvas = np.zeros((height, width, 3), np.uint8)

# Getting all header images in a list
folderPath = 'Hand Tracking Project\Header'
myList = os.listdir(folderPath)
overlayList = []
for imPath in myList:
    image = cv2.imread(f'{folderPath}/{imPath}')
    overlayList.append(image)

# Presettings:
header = overlayList[0]
drawColor = (0, 0, 255)
thickness = 20 # Thickness of the painting
tipIds = [4, 8, 12, 16, 20] # Fingertips indexes
xp, yp = [0, 0] # Coordinates that will keep track of the last position of the index finger

with mp_hands.Hands(min_detection_confidence=0.85, min_tracking_confidence=0.5, max_num_hands=1) as hands:
    while cap.isOpened():
        success, image = cap.read()
        if not success:
            print("Ignoring empty camera frame.")
            break

        # Flip the image horizontally for a later selfie-view display, and convert
        # the BGR image to RGB.
        image = cv2.cvtColor(cv2.flip(image, 1), cv2.COLOR_BGR2RGB)
        # To improve performance, optionally mark the image as not writeable to
        # pass by reference.
        image.flags.writeable = False
        results = hands.process(image)

        image = cv2.cvtColor(image, cv2.COLOR_RGB2BGR)
        if results.multi_hand_landmarks:
            for hand_landmarks in results.multi_hand_landmarks:
                # Getting all hand points coordinates
                points = []
                for lm in hand_landmarks.landmark:
                    points.append([int(lm.x * width), int(lm.y * height)])

                # Only go through the code when a hand is detected
                if len(points) != 0:
                    x1, y1 = points[8]  # Index finger
                    x2, y2 = points[12] # Middle finger
                    x3, y3 = points[4]  # Thumb
                    x4, y4 = points[20] # Pinky

                    ## Checking which fingers are up
                    fingers = []
                    # Checking the thumb
                    if points[tipIds[0]][0] < points[tipIds[0] - 1][0]:
                        fingers.append(1)
                    else:
                        fingers.append(0)

                    # The rest of the fingers
                    for id in range(1, 5):
                        if points[tipIds[id]][1] < points[tipIds[id] - 2][1]:
                            fingers.append(1)
                        else:
                            fingers.append(0)

                    ## Selection Mode - Two fingers are up
                    nonSel = [0, 3, 4] # indexes of the fingers that need to be down in the Selection Mode
                    if (fingers[1] and fingers[2]) and all(fingers[i] == 0 for i in nonSel):
                        xp, yp = [x1, y1]

                        # Selecting the colors and the eraser on the screen
                        if(y1 < 125):
                            if(170 < x1 < 295):
                                header = overlayList[0]
                                drawColor = (0, 0, 255)
                            elif(436 < x1 < 561):
                                header = overlayList[1]
                                drawColor = (255, 0, 0)
                            elif(700 < x1 < 825):
                                header = overlayList[2]
                                drawColor = (0, 255, 0)
                            elif(980 < x1 < 1105):
                                header = overlayList[3]
                                drawColor = (0, 0, 0)

                        cv2.rectangle(image, (x1-10, y1-15), (x2+10, y2+23), drawColor, cv2.FILLED)

                    ## Stand by Mode - Checking when the index and the pinky fingers are open and dont draw
                    nonStand = [0, 2, 3] # indexes of the fingers that need to be down in the Stand Mode
                    if (fingers[1] and fingers[4]) and all(fingers[i] == 0 for i in nonStand):
                        # The line between the index and the pinky indicates the Stand by Mode
                        cv2.line(image, (xp, yp), (x4, y4), drawColor, 5)
                        xp, yp = [x1, y1]

                    ## Draw Mode - One finger is up
                    nonDraw = [0, 2, 3, 4]
                    if fingers[1] and all(fingers[i] == 0 for i in nonDraw):
                        # The circle in the index finger indicates the Draw Mode
                        cv2.circle(image, (x1, y1), int(thickness/2), drawColor, cv2.FILLED)
                        if xp==0 and yp==0:
                            xp, yp = [x1, y1]
                        # Draw a line between the current position and the last position of the index finger
                        cv2.line(imgCanvas, (xp, yp), (x1, y1), drawColor, thickness)
                        # Update the last position
                        xp, yp = [x1, y1]

                    ## Clear the canvas when the hand is closed
                    if all(fingers[i] == 0 for i in range(0, 5)):
                        imgCanvas = np.zeros((height, width, 3), np.uint8)
                        xp, yp = [x1, y1]

                    ## Adjust the thickness of the line using the index finger and thumb
                    selecting = [1, 1, 0, 0, 0] # Selecting the thickness of the line
                    setting = [1, 1, 0, 0, 1]   # Setting the thickness chosen
                    if all(fingers[i] == j for i, j in zip(range(0, 5), selecting)) or all(fingers[i] == j for i, j in zip(range(0, 5), setting)):

                        # Getting the radius of the circle that will represent the thickness of the draw
                        # using the distance between the index finger and the thumb.
                        r = int(math.sqrt((x1-x3)**2 + (y1-y3)**2)/3)

                        # Getting the middle point between these two fingers
                        x0, y0 = [(x1+x3)/2, (y1+y3)/2]

                        # Getting the vector that is orthogonal to the line formed between
                        # these two fingers
                        v1, v2 = [x1 - x3, y1 - y3]
                        v1, v2 = [-v2, v1]

                        # Normalizing it
                        mod_v = math.sqrt(v1**2 + v2**2)
                        v1, v2 = [v1/mod_v, v2/mod_v]

                        # Draw the circle that represents the draw thickness in (x0, y0) and orthogonaly
                        # translated c units
                        c = 3 + r
                        x0, y0 = [int(x0 - v1*c), int(y0 - v2*c)]
                        cv2.circle(image, (x0, y0), int(r/2), drawColor, -1)

                        # Setting the thickness chosen when the pinky finger is up
                        if fingers[4]:
                            thickness = r
                            cv2.putText(image, 'Check', (x4-25, y4-8), cv2.FONT_HERSHEY_TRIPLEX, 0.8, (0,0,0), 1)

                        xp, yp = [x1, y1]

        # Setting the header in the video
        image[0:125, 0:width] = header

        # The image processing to produce the image of the camera with the draw made in imgCanvas
        imgGray = cv2.cvtColor(imgCanvas, cv2.COLOR_BGR2GRAY)
        _, imgInv = cv2.threshold(imgGray, 5, 255, cv2.THRESH_BINARY_INV)
        imgInv = cv2.cvtColor(imgInv, cv2.COLOR_GRAY2BGR)
        img = cv2.bitwise_and(image, imgInv)
        img = cv2.bitwise_or(img, imgCanvas)

        cv2.imshow('MediaPipe Hands', img)
        if cv2.waitKey(3) & 0xFF == ord('q'):
            break
cap.release()
cv2.destroyAllWindows()
Output:
Get Huge Discounts

More Python Projects
