
BMI Calculator using python With source Code

Introduction:
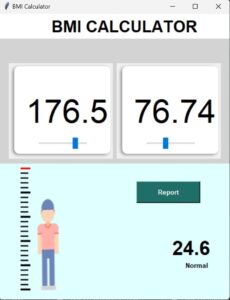
In this project, we will build up an Advanced BMI Calculator by the tkinter library of Python. It is the standard GUI library of Python. With the help of sliders, the user can mention their height and weight, by clicking the report button they can see their calculated BMI and get the message about their health condition. The image inserted will get resized according to the movement of the slider, which is possible by the “Image” & “ImageTk” libraries under the PIL module of Python. Let’s dig deep into the steps to build this project!
Explanation:
The first step is importing all the necessary libraries using the “import” keyword. For the latest version, the tkinter module comes under the future module. So first, we have to install the future module with the help of the command “pip install <module-name>”. The future module is a built-in module in Python that inherits new features which are available in the latest Python versions. With “future. moves” we will import the tkinter module.
For creating the GUI we will import the tkinter module, to style the tkinter widgets we will import the ttk module, and finally, to add image processing capabilities we will import the PIL module.
In the next step, to create an object of the tkinter frame will use “.Tk()”.With this, we will also set the title and geometry of our tkinter application. To set the background color for the project we will use “.config(bg=<color name>)”. And so, with that, we have set “grey” as the background color for this project.
We will create a Label widget for the heading stating “BMI CALCULATOR” by using the “.Label()” and with the help of “.place()” we will set the position for the label accordingly. With this, one more label will be created of the color “light cyan” for packing the parent widget from the bottom side by using the “.pack(side=” bottom”)”. After making these two labels you will be able to see that our GUI got divided into two areas i.e. one with grey and the other with light cyan.
The next step is to place the images of the two boxes containing the height and weight parameters and a scale image. For this process, first, we will get the image to our application by “.PhotoImage(file=<filename>)”, in addition to this we will also create the label for this image and then with the help of “.place()” we will set the positions of the two boxes.
The same procedure will get followed for the scale image to appear on our tkinter application.
Now, we want a slider to appear on the boxes. To handle the floating data we will initialize the variable by using the “.DoubleVar()”. In the next step, we made a function named “get_current()” to get the current value for height and “get_current2()” for the weight. With the help of “ttk. Scale()” will get the slider on the window and by using the “ .place()” we will set the position of the sliders such that they may appear inside the boxes. The same procedure will get followed for another slider to get appear under the weight box
The next thing we want to accomplish is that when we make use of the slider under the box considering the height of the person then accordingly the image should get resized for the user interaction. So, first of all, we will open the image by “Image. open()” and by the” .resize()” we will make the image resizable, and by “ImageTk.PhotoImage()” will make the resizable image appear on the window and we will place it accordingly. All of this part will get covered under another function “slider_c()” .
For the numbers to appear and enter we need to create the two entry widgets for height and weight boxes, by using the “tkinter. Entry()” we will do so, and again, with the help of “.place()” we will set their positions.
The next step is to provide the result to the user. For doing so, we will create a button widget stating “report” by using “tkinter. Button()” such that whenever the user will click the button, the result will be displayed. Under this widget, we will call the “bmi ()”, a user-defined function that will calculate the BMI from the data.
For the result to appear, will again create two label widgets, the first one for showing the Calculated BMI and the other for stating health condition by using the “.Label()”.
Source Code:
Get Discount on Top Educational Courses
					# Importing the libraries
from future.moves import tkinter
from tkinter import ttk
from PIL import Image, ImageTk

# creating an object
root = tkinter.Tk()

# setting title and geomerty
root.title("BMI Calculator")
root.geometry("470x580+300+200")

# background color for window
root.config(bg="lightgrey")


# BMI Calculation
def bmi():
    Height = float(h.get())
    Weight = float(w.get())
    m = Height / 100  # converting height into meter
    B = round(float(Weight / m ** 2), 1)  # calculating
    label.config(text=B)  # displaying

    # conditions
    if B <= 18.5:
        label1.config(text="Underweight")
    elif (B > 18.5) and (B <= 25):
        label1.config(text="Normal")
    elif (B > 25) and (B <= 30):
        label1.config(text="Overweight")
    else:
        label1.config(text="Health is at risk!\n Need to lose")


# Heading label
top = tkinter.Label(root, text="BMI CALCULATOR", font=("arial", 25, "bold"), width=25, bd=5, bg="white")
top.place(x=0, y=0)

# Bottom box
tkinter.Label(root, width=72, height=18, bg="lightcyan").pack(side="bottom")

# two boxes
box = tkinter.PhotoImage(file="bo.png")
tkinter.Label(root, image=box).place(x=20, y=100)
tkinter.Label(root, image=box).place(x=240, y=100)

# scale
scale = tkinter.PhotoImage(file="scale.png")
tkinter.Label(root, image=scale, bg="lightcyan").place(x=20, y=310)

# slider 1
current = tkinter.DoubleVar()


def get_current():
    return '{: .2f}'.format(current.get())


def slider_c(event):
    height.set(get_current())

    # resizing image according to the slider
    size = int(float(get_current()))
    img = (Image.open("man.png"))
    resize = img.resize((50, 10 + size))
    p = ImageTk.PhotoImage(resize)
    man.config(image=p)
    man.place(x=70, y=550 - size)
    man.image = p


# to change bg
style_h = ttk.Style()
style_h.configure("TScale", background="white")

# Getting slider on window
slider_h = ttk.Scale(root, from_=0, to=220, orient="horizontal", style="TScale", command=slider_c, variable=current)
slider_h.place(x=80, y=250)

# slider 2
current2 = tkinter.DoubleVar()


def get_current2():
    return '{: .2f}'.format(current2.get())


def slider_c2(event):
    weight.set(get_current2())


# to change bg
style_w = ttk.Style()
style_w.configure("TScale", background="white")

slider_w = ttk.Scale(root, from_=0, to=200, orient="horizontal", style="TScale", command=slider_c2, variable=current2)
slider_w.place(x=300, y=250)

# Entry widget for height
height = tkinter.StringVar()
weight = tkinter.StringVar()
h = tkinter.Entry(root, textvariable=height, width=5, font=("arial", 50), bg="white", fg="black", bd=0,
                  justify="center")
h.place(x=35, y=160)
height.set(get_current())

# Entry widget for weight
w = tkinter.Entry(root, textvariable=weight, width=5, font=("arial", 50), bg="white", fg="black", bd=0,
                  justify="center")
w.place(x=255, y=160)
weight.set(get_current2())

# man
man = tkinter.Label(root, bg="lightcyan")
man.place(x=70, y=530)

# button for report
tkinter.Button(root, text="Report", width=15, height=2, font=("Arial", 10, "bold"), bg="#1f6e68", fg="white",
               command=bmi).place(x=280, y=340)

# label widget for showing calculated BMI
label = tkinter.Label(root, font=("arial", 30, "bold"), bg="lightcyan", fg="black")
label.place(x=350, y=450)

# Label widget for showing message
label1 = tkinter.Label(root, font=("arial", 10, "bold"), bg="lightcyan", fg="black", width=50)
label1.place(x=200, y=500)

# event loop
root.mainloop()
The last part to discuss is the UDF bmi(). Under this, we will first get the height and weight parameters from the entry widget by using the “.get()”, then we will convert the height into meters by dividing it by 100. Now finally we will apply the formula i.e.[ weight/ (height in meters)^2]. Then we will make the calculated bmi get displayed on the window by “.config()”. To display the messages about the health condition we will use an “if-else” ladder.
The conditions are as follows:
- If the calculated BMI is less than 18.5 then the person’s health is considered as “Underweight”
- If it is between 18.5 and 25 then it is “Normal”
- If it is between 25 and 30 then the person’s health is considered as “Overweight”
- If it exceeds 30 then the person’s health is at risk and the one has to lose immediately.
In the end, with the help of “.mainloop()” will make our project run successfully!
Output:
Find More Projects

URL Shortener Using Python Django Introduction: Long URLs can be shortened into short, shareable links with the help of the URL Shortener …

User Authentication System Using Python Django Introduction: The implementation of safe and adaptable user authentication in Django is the main goal of …

The E-Learning System using Java with a Graphical User Interface (GUI) Introduction The E-Learning System is developed using Java (with a Graphical …

Weather App Using Python Django Introduction: When a user enters the name of a city, the Weather App retrieves current weather information. …

Quiz App Using Python Django Introduction: Users can take quizzes in a variety of subjects, see their results, and monitor their progress …

resume screener in python using python introduction The hiring process often begins with reviewing numerous resumes to filter out the most suitable …
Get Huge Discounts

More Python Projects
