
Volume & Brightness Control Using Open CV Python With Source Sode
Introduction :
More and more, in the digital world that we live today what involves changing volume or brightness wise are devices; Usually, this is accomplished by hardware buttons or on- display sliders. New approaches enabled by the computer vision and machine learning advancements that push against this status quo of static settings, instead providing potential pathways to manage these spaces as part of a more dynamic experience.
OpenCV is Open Source Computer Vision Library which provides a plethora of functions for image and video processing. Using OpenCV functions, such applications are designed for instant interpretation of surroundings and control on settings like volume & brightness etc. Beyond adding refinement to UI, this way moving many of the controls itself becomes more approachable and less projectible.
Language And Interface :-
Volume & Brightness Control Using Python , A Versatile Programming Language With Source Code
Required Modules Or Packages :-
You Need The Packages List Given Below :-
- OpenCV: Open Source Computer Vision is a software for image processing and computer
- Mediapipe: The MediaPipe framework is a cross-platform library that enables processing of multimodal data using multiplexed (or synchronized) media
- Math: Python comes with the mathematical functions and constants module that allows you to perform dozens of numerical operations.
- Numpy — It is the core library for numerical computing in Python which provides support to arrays and linear algebra operations, maths function used on these
- Ctypes: ctypes is a foreign function interface (FFI) to call functions exported from DLLs or shared libraries.
- Comtypes : comtypes This module provides a framework to display admin’s work in
- pycaw : is a python library for changing audio settings and volume on windows Or auto mute secondary output effort from creating open source to either selectively.
- protobuf.json_format: This module that can convert to and from json (from Google Protocol Buffers)
- screen_brightness_control (Use for changing monitor brightness) : This is a Python Library Use To control device’s Brightness .
How To Run The Code :-
Step 1 . First , You Download and Install Visual Studio Code or VS Code In your PC or Laptop by VS Code Official Website .
Step 2 . Now Open CMD As Administrator and install the above packages using pip .
Step 3 . Now Open Visual Studio Code .
Step 4. Now Make The file named volume_brightness_control.py .
Step 5 . Now Copy And Paste The Code Given Below 𝗍
Step 6 . After pasting The code , Save This & Click On Run Button .
Step 7 . Now You will See The Output .
Code Explaination :-
This is a Python Script to control device settings e.g., screen brightness or audio volume using hand gestures and create an interactive system. It relies on several libraries for computer vision, audio control and screen brightness manipulation.
Components and Workflow
Library Imports:
OpenCV: To capture and Process Video Frames from the webcam. Mediapipe — Hand tracking and detection
Math: Measures distance between two points
NumPy: Helps map the hand gesture distances to brightness and volume levels.
Ctypes + Comtypes: for direct convenient usage of system-level audio controls on Windows.
Library Used: PyCaw – To manage volume settings of the audio.
Proto: Data from OKS/Mediapipe is processed/dispatchful by Google Protobuf. Screen Brightness Control: Changes the screen brightness.
Setup:
The script to first initialize the webcam for live video. It prepares mediapipe for hand landmarking and tracking. This event configures volume controls on the audio control interface. It sets up the system so that you will be able to control screen brightness.
Main Loop:
And also, back to the script that captures video frames from my webcam and flips the image so it is like a mirror effect, then processes this flipped frame for hand landmarks. Hand Detection: Mediapipe detects which hand (left or right) is visible as well detect landmarks on Hand.
Adjust Brightness:
The right hand script handleplaces the gap between thumb and index finger. The range of brightness levels corresponds to a distance. It will adjust the screen brightness.
Adjust Volume:
The measurement for the distance between the right-hand thumb and index finger is done in a way. This range is translating into the system volume scale. The system volume is set according to this measurement.
Display and Exit:
It displays the processed video feed (drawn hand landmarks, visual indicators) in a window. The script then continues to update the display and adjust settings in real-time, until the user presses q Key to exit .
Get Discount on Top Educational Courses
Source Code :
					import cv2
import mediapipe as mp
from math import hypot
import numpy as np
from ctypes import cast, POINTER
from comtypes import CLSCTX_ALL
from pycaw.pycaw import AudioUtilities, IAudioEndpointVolume
from google.protobuf.json_format import MessageToDict
import screen_brightness_control as sbc

# Left Hand for Brightness # Right Hand for Volume

cap = cv2.VideoCapture(0)

mpHands = mp.solutions.hands
hands = mpHands.Hands(min_detection_confidence=0.75)
mpDraw = mp.solutions.drawing_utils

devices = AudioUtilities.GetSpeakers()
interface = devices.Activate(IAudioEndpointVolume._iid_, CLSCTX_ALL, None)
volume = cast(interface, POINTER(IAudioEndpointVolume))

volMin, volMax = volume.GetVolumeRange()[:2]

while True:
    success, img = cap.read()
    img = cv2.flip(img, 1)
    imgRGB = cv2.cvtColor(img, cv2.COLOR_BGR2RGB)
    results = hands.process(imgRGB)

    left_lmList, right_lmList = [], []
    if results.multi_hand_landmarks and results.multi_handedness:
        for i in results.multi_handedness:
            label = MessageToDict(i)['classification'][0]['label']
            if label == 'Left':
                for lm in results.multi_hand_landmarks[0].landmark:
                    h, w, _ = img.shape
                    left_lmList.append([int(lm.x * w), int(lm.y * h)])
                mpDraw.draw_landmarks(img, results.multi_hand_landmarks[0], mpHands.HAND_CONNECTIONS)
            if label == 'Right':
                index = 0
                if len(results.multi_hand_landmarks) == 2:
                    index = 1
                for lm in results.multi_hand_landmarks[index].landmark:
                    h, w, _ = img.shape
                    right_lmList.append([int(lm.x * w), int(lm.y * h)])
                mpDraw.draw_landmarks(img, results.multi_hand_landmarks[index], mpHands.HAND_CONNECTIONS)

    if left_lmList != []:
        x1, y1 = left_lmList[4][0], left_lmList[4][1]
        x2, y2 = left_lmList[8][0], left_lmList[8][1]
        cv2.line(img, (x1, y1), (x2, y2), (0, 255, 0), 3)
        length = hypot(x2 - x1, y2 - y1)
        bright = np.interp(length, [15, 200], [0, 100])
        print(bright, length)
        sbc.set_brightness(int(bright))

    if right_lmList != []:
        x1, y1 = right_lmList[4][0], right_lmList[4][1]
        x2, y2 = right_lmList[8][0], right_lmList[8][1]
        cv2.line(img, (x1, y1), (x2, y2), (0, 255, 0), 3)
        length = hypot(x2 - x1, y2 - y1)
        vol = np.interp(length, [15, 200], [volMin, volMax])
        print(vol, length)
        volume.SetMasterVolumeLevel(vol, None)

    cv2.imshow('Image', img)
    if cv2.waitKey(1) & 0xff == ord('q'):
        break
Output :
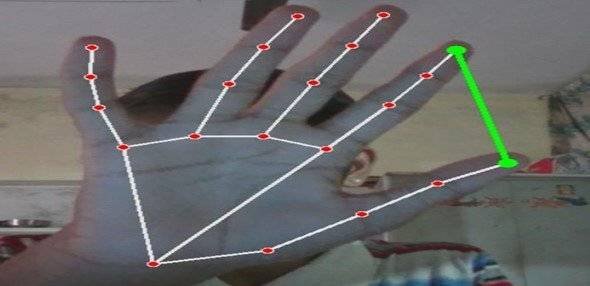
After Running the Code , You Will See The Output . Left Hand For Brightness And Right Hand For Volume . Drag You Fingers For Adjusting Volume & Brightness Of Device
Find More Projects

URL Shortener Using Python Django Introduction: Long URLs can be shortened into short, shareable links with the help of the URL Shortener …

User Authentication System Using Python Django Introduction: The implementation of safe and adaptable user authentication in Django is the main goal of …

The E-Learning System using Java with a Graphical User Interface (GUI) Introduction The E-Learning System is developed using Java (with a Graphical …

Weather App Using Python Django Introduction: When a user enters the name of a city, the Weather App retrieves current weather information. …

Quiz App Using Python Django Introduction: Users can take quizzes in a variety of subjects, see their results, and monitor their progress …

resume screener in python using python introduction The hiring process often begins with reviewing numerous resumes to filter out the most suitable …
Get Huge Discounts

More Python Projects
