
User Authentication System Using Python Django
Introduction:
The implementation of safe and adaptable user authentication in Django is the main goal of this project. It has features for profile updates, password resets, logins, and logouts.
An email address and password, which are hashed and safely stored, are required for new users to register. In addition to managing sessions and preventing unwanted access to protected routes, Django’s authentication system verifies credentials.
Users are taken to their dashboard after logging in. They have the ability to view their login history, modify passwords, and edit personal information. Password resets via email are also used, frequently via SMTP or Django-Allauth.
User-friendly forms with validation messages are part of the interface. For a contemporary UI, use Tailwind CSS or Bootstrap. Secure user management is a fundamental need for any web platform that this app addresses. Beginners who are learning middleware, session handling, and Django’s integrated user model will find it especially helpful.
Its depth of customization is what makes it special. It’s the ideal foundation for expanding into more intricate user roles like premium user, moderator, or administrator.
Required Modules or Packages:
Python 3.8+: Make sure you have Python version 3.8 or higher installed on your system.
Django 3.x or 4.x: You’ll need the Django framework, version 3.x or 4.x, to build and run the system.
pip: This is the Python package manager that you’ll use to install the required libraries and packages.
You can install the core requirements with:
pip install django
pip install -r requirements.txt
How to Run the Code:
Follow these steps to launch the application locally:
✅ STEP 1: Download or Clone the Project
Option A: If you have a ZIP file
1. Extract it to a folder.
2. Open that folder in VS Code:
VS Code → File → Open Folder…
Option B: If using Git clone
git clone https://github.com/username/repository-name.git
cd repository-name
code .
✅ STEP 2: Set Up Virtual Environment
This keeps your project dependencies isolated.
# Create virtual environment (in project folder)
python -m venv venv
# Activate it:
# On Windows:
venv\Scripts\activate

# On macOS/Linux:
source venv/bin/activate
✅ STEP 3: Install Requirements
Most Django projects have a requirements.txt file. Install the packages:
pip install -r requirements.txt
If requirements.txt is missing, you can manually install Django:
pip install django
✅ STEP 4: Configure .env or Settings (If Required)
Some projects require .env files (for secret keys or DB settings).
Check the README or .env.example if present, and create your own .env.
✅ STEP 5: Run Migrations
python manage.py makemigrations
python manage.py migrate
✅ STEP 6: Create Superuser (for Admin Login)
python manage.py createsuperuser
Follow the prompts.
✅ STEP 7: Run the Django Development Server
python manage.py runserver
Open http://127.0.0.1:8000 in your browser.
Use /admin to access the admin panel.
Code Explanation:
📁 1. Models: models.py
This file is empty since Django’s built-in User model is used. There’s no need to create a custom model unless additional fields are required.
🧠 2. Views: views.py
📝 User Registration
def registerPage(request):
if request.user.is_authenticated:
return redirect('home')
else:
form = CreateUserForm()
if request.method == 'POST':
form = CreateUserForm(request.POST)
if form.is_valid():
form.save()
return redirect('login')
return render(request, 'register.html', {'form': form})
Displays a registration form using CreateUserForm.
If the form is valid and submitted, a new user is saved.
🔑 Login View
def loginPage(request):
if request.user.is_authenticated:
return redirect('home')
else:
if request.method == 'POST':
username = request.POST.get('username')
password = request.POST.get('password')

user = authenticate(request, username=username, password=password)

if user is not None:
login(request, user)
return redirect('home')
return render(request, 'login.html')
Authenticates credentials using Django’s authenticate() function.
If valid, login() logs the user in and redirects to the home page.
🚪 Logout
def logoutUser(request):
logout(request)
return redirect('login')
Logs out the current user using Django’s logout() function.
🏠 Home View (Protected)
@login_required(login_url='login')
def home(request):
return render(request, 'home.html')
Uses the @login_required decorator to restrict access to authenticated users.
📄 3. Forms: forms.py
from django.contrib.auth.forms import UserCreationForm
from django.contrib.auth.models import User

class CreateUserForm(UserCreationForm):
class Meta:
model = User
fields = ['username', 'email', 'password1', 'password2']
Extends UserCreationForm to include email in addition to username and passwords.
🗺 4. URLs: urls.py
urlpatterns = [
path('', views.home, name='home'),
path('register/', views.registerPage, name='register'),
path('login/', views.loginPage, name='login'),
path('logout/', views.logoutUser, name='logout'),
]
Routes to each view: home, login, register, logout.
🎨 5. Templates:
Includes:
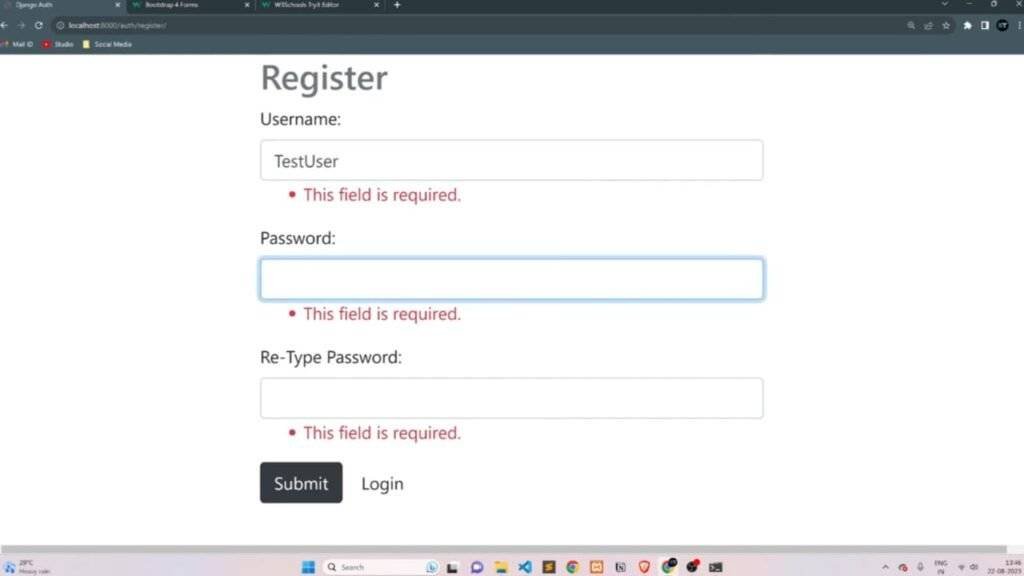
register.html – signup form
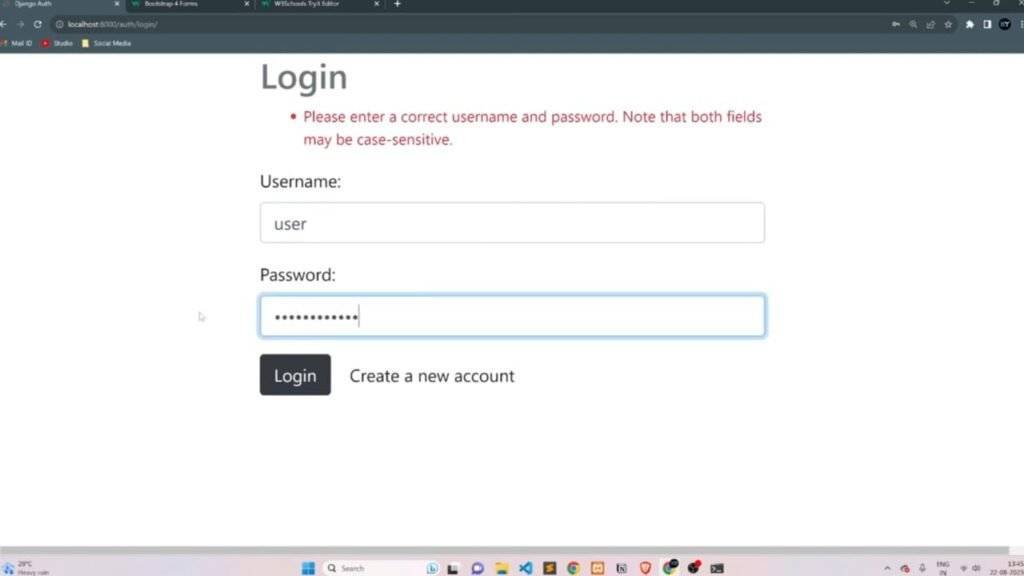
login.html – login form
home.html – welcome page for authenticated users
Source Code:
To explore the full source code, click the button below to download the ZIP file and run it on your local machine:
Output:
Get Huge Discounts

More Python Projects
