
OMR MCǪ Automated Grading Using Open CV Python With Source Code

Introduction :
Now We Will Make a OMR MCǪ Automated Grading System Using Open CV Python , A Versatile Programming Language . To Make this System , We need some modules or Packages from Python Library Like numpy , cv2 , utils . Optical Mark Recognition (OMR)
is a technology to grading the multiple choice questions (MCǪ’S) in Exams . Open CV , A computer vision library enables the detection and analyse the marks of scanned OMR Sheet . This system will automatically determine the correct answers from answer sheets . This system have quick result , decreases manual errors , saves time and provide accurate result . It is helpful for those educational institutions who conducts the large assessments . It is easy to use .
Language And Interface :-
OMR MCǪ Automated Grading Using Python , A Versatile Programming Language With Source Code
Required Modules Or Packages:-
You Need The Packages List Given Below :-
- Numpy :- It is a core library for numerical computation in python and it can handle large arrays of numbers.
- cv2 :- It is a library to use in Computer Vision task. You will get basic image processing tools while using cv2 for example, Image Reading and Writing .
- utils :- This python library provide helpful tools and shortcuts to make programming tasks easier and fast .
How To Run The Code :-
Step 1 . First , You Download and Install Visual Studio Code or VS Code In your PC or Laptop by VS Code Official Website .
Step 2 . Now Open CMD As Administrator and install the above packages using pip .
Step 3 . Now Open Visual Studio Code .
Step 4. Now Make The file named as OMRMain.py .
Step 5 . Now Copy And Paste The Code from the Link Given Below
Step 6 . After pasting The code , Save This & Click On Run Button .
Step 7 . Now You will See The Output .
Code Explanation :-
This Python code is used to Automated OMR Grading from Any Image Files format . Step-by-Step Guide Given Below:-
Imports :
- Numpy :- It is a core library for numerical computation in python and it can handle large arrays of numbers.
- cv2 :- It is a library to use in Computer Vision task. You will get basic image processing tools while using cv2 for example, Image Reading and Writing .
- utils :- This python library provide helpful tools and shortcuts to make programming tasks easier and fast .
Setup and Configuration :
webCamFeed : This code is used to initialize the variables for webcam usage .
ans : This is used to Detect image dimensions and the correct answers .
Image Preprocessing :
imgGray : The image is converted to grayscale by using this python library .
imgBlur : The image is convert into blur by using this .
imgCanny : This is used to detect edges using Canny Method .
Perspective Transformation :
After identification of rectangular contors , perspective transformation is applied to warp
these regions into a flat .
Thresholding and Splitting :
After Warping the regions of OMR into flat , It is thresholded to create a binary images , where filled circles are highlighted from OMR Sheet . Then This OMR Sheet is divided into individual boxes .
Answer Detection :
This code calculates the numbers of filled circles in answer sheet . Then The user’s answers are compared to the correct answers to determine if they are correct or not by using this python library — ans
Grading :
The Final score card is generated after calculating all the correct answers and saved as image file .
Get Discount on Top Educational Courses
Source Code :
OMR_Main.py
					import cv2
import numpy as np
import utlis

########################################################################
webCamFeed = True
pathImage = "5.jpg"
cap = cv2.VideoCapture(1)
cap.set(10, 160)
heightImg = 500
widthImg = 500
questions = 5
choices = 5
ans = [1, 2, 0, 2, 4]
########################################################################

count = 0

while True:
    if webCamFeed:
        success, img = cap.read()
    else:
        img = cv2.imread(pathImage)
        img = cv2.resize(img, (widthImg, heightImg))
        # RESIZE IMAGE
        imgFinal = img.copy()
        imgBlank = np.zeros((heightImg, widthImg, 3), np.uint8)  # CREATE A BLANK IMAGE FOR TESTING DEBUGGING IF REQUIRED
        imgGray = cv2.cvtColor(img, cv2.COLOR_BGR2GRAY)  # CONVERT IMAGE TO GRAY SCALE
        imgBlur = cv2.GaussianBlur(imgGray, (5, 5), 1)  # ADD GAUSSIAN BLUR
        imgCanny = cv2.Canny(imgBlur, 10, 70)  # APPLY CANNY

    try:
        ## FIND ALL COUNTOURS
        imgContours = img.copy()  # COPY IMAGE FOR DISPLAY PURPOSES
        imgBigContour = img.copy()  # COPY IMAGE FOR DISPLAY PURPOSES
        contours, hierarchy = cv2.findContours(imgCanny, cv2.RETR_EXTERNAL, cv2.CHAIN_APPROX_NONE)  # FIND ALL CONTOURS
        cv2.drawContours(imgContours, contours, -1, (0, 255, 0), 10)  # DRAW ALL DETECTED CONTOURS
        rectCon = utlis.rectContour(contours)  # FILTER FOR RECTANGLE CONTOURS
        biggestPoints = utlis.getCornerPoints(rectCon[0])  # GET CORNER POINTS OF THE BIGGEST RECTANGLE
        gradePoints = utlis.getCornerPoints(rectCon[1])  # GET CORNER POINTS OF THE SECOND BIGGEST RECTANGLE

        if biggestPoints.size != 0 and gradePoints.size != 0:
            # BIGGEST RECTANGLE WARPING
            biggestPoints = utlis.reorder(biggestPoints)  # REORDER FOR WARPING
            cv2.drawContours(imgBigContour, biggestPoints, -1, (0, 255, 0), 20)  # DRAW THE BIGGEST CONTOUR
            pts1 = np.float32(biggestPoints)  # PREPARE POINTS FOR WARP
            pts2 = np.float32([[0, 0], [widthImg, 0], [0, heightImg], [widthImg, heightImg]])  # PREPARE POINTS FOR WARP
            matrix = cv2.getPerspectiveTransform(pts1, pts2)  # GET TRANSFORMATION MATRIX
            imgWarpColored = cv2.warpPerspective(img, matrix, (widthImg, heightImg))  # APPLY WARP PERSPECTIVE

            # SECOND BIGGEST RECTANGLE WARPING
            cv2.drawContours(imgBigContour, gradePoints, -1, (255, 0, 0), 20)  # DRAW THE BIGGEST CONTOUR
            gradePoints = utlis.reorder(gradePoints)  # REORDER FOR WARPING
            ptsG1 = np.float32(gradePoints)  # PREPARE POINTS FOR WARP
            ptsG2 = np.float32([[0, 0], [325, 0], [0, 150], [325, 150]])  # PREPARE POINTS FOR WARP
            matrixG = cv2.getPerspectiveTransform(ptsG1, ptsG2)  # GET TRANSFORMATION MATRIX
            imgGradeDisplay = cv2.warpPerspective(img, matrixG, (325, 150))  # APPLY WARP PERSPECTIVE

            # APPLY THRESHOLD
            imgWarpGray = cv2.cvtColor(imgWarpColored, cv2.COLOR_BGR2GRAY)  # CONVERT TO GRAYSCALE
            imgThresh = cv2.threshold(imgWarpGray, 170, 255, cv2.THRESH_BINARY_INV)[1]  # APPLY THRESHOLD AND INVERSE

            boxes = utlis.splitBoxes(imgThresh)  # GET INDIVIDUAL BOXES
            cv2.imshow("Split Test ", boxes[3])
            countR = 0
            countC = 0
            myPixelVal = np.zeros((questions, choices))  # TO STORE THE NON ZERO VALUES OF EACH BOX
            for image in boxes:
                # cv2.imshow(str(countR)+str(countC),image)
                totalPixels = cv2.countNonZero(image)
                myPixelVal[countR][countC] = totalPixels
                countC += 1
                if countC == choices:
                    countC = 0
                    countR += 1

            # FIND THE USER ANSWERS AND PUT THEM IN A LIST
            myIndex = []
            for x in range(0, questions):
                arr = myPixelVal[x]
                myIndexVal = np.where(arr == np.amax(arr))
                myIndex.append(myIndexVal[0][0])
            # print("USER ANSWERS",myIndex)

            # COMPARE THE VALUES TO FIND THE CORRECT ANSWERS
            grading = []
            for x in range(0, questions):
                if ans[x] == myIndex[x]:
                    grading.append(1)
                else:
                    grading.append(0)
            # print("GRADING",grading)
            score = (sum(grading) / questions) * 100  # FINAL GRADE
            # print("SCORE",score)

            # DISPLAYING ANSWERS
            utlis.showAnswers(imgWarpColored, myIndex, grading, ans)  # DRAW DETECTED ANSWERS
            utlis.drawGrid(imgWarpColored)  # DRAW GRID
            imgRawDrawings = np.zeros_like(imgWarpColored)  # NEW BLANK IMAGE WITH WARP IMAGE SIZE
            utlis.showAnswers(imgRawDrawings, myIndex, grading, ans)  # DRAW ON NEW IMAGE
            invMatrix = cv2.getPerspectiveTransform(pts2, pts1)  # INVERSE TRANSFORMATION MATRIX
            imgInvWarp = cv2.warpPerspective(imgRawDrawings, invMatrix, (widthImg, heightImg))  # INV IMAGE WARP

            # DISPLAY GRADE
            imgRawGrade = np.zeros_like(imgGradeDisplay, np.uint8)  # NEW BLANK IMAGE WITH GRADE AREA SIZE
            cv2.putText(imgRawGrade, str(int(score)) + "%", (70, 100),
                        cv2.FONT_HERSHEY_COMPLEX, 3, (0, 255, 255), 3)  # ADD THE GRADE TO NEW IMAGE
            invMatrixG = cv2.getPerspectiveTransform(ptsG2, ptsG1)  # INVERSE TRANSFORMATION MATRIX
            imgInvGradeDisplay = cv2.warpPerspective(imgRawGrade, invMatrixG, (widthImg, heightImg))  # INV IMAGE WARP

            # SHOW ANSWERS AND GRADE ON FINAL IMAGE
            imgFinal = cv2.addWeighted(imgFinal, 1, imgInvWarp, 1, 0)
            imgFinal = cv2.addWeighted(imgFinal, 1, imgInvGradeDisplay, 1, 0)

            # IMAGE ARRAY FOR DISPLAY
            imageArray = ([img, imgGray, imgCanny, imgContours],
                          [imgBigContour, imgThresh, imgWarpColored, imgFinal])
            cv2.imshow("Final Result", imgFinal)
    except:
        imageArray = ([img, imgGray, imgCanny, imgContours],
                      [imgBlank, imgBlank, imgBlank, imgBlank],
                      [imgBlank, imgBlank, imgBlank, imgBlank])

    # LABELS FOR DISPLAY
    lables = [["Original", "Gray", "Edges", "Contours"],
              ["Biggest Contour", "Threshold", "Warpped", "Final"]]

    stackedImage = utlis.stackImages(imageArray, 0.5, lables)
    cv2.imshow("Result", stackedImage)

    # SAVE IMAGE WHEN 's' key is pressed
    if cv2.waitKey(1) & 0xFF == ord('s'):
        cv2.imwrite("Scanned/myImage" + str(count) + ".jpg", imgFinal)
        cv2.rectangle(stackedImage, ((int(stackedImage.shape[1] / 2) - 230), int(stackedImage.shape[0] / 2) + 50),
                      (1100, 350), (0, 255, 0), cv2.FILLED)
        cv2.putText(stackedImage, "Scan Saved", (int(stackedImage.shape[1] / 2) - 200, int(stackedImage.shape[0] / 2)),
                    cv2.FONT_HERSHEY_DUPLEX, 3, (0, 0, 255), 5, cv2.LINE_AA)
        cv2.imshow('Result', stackedImage)
        cv2.waitKey(300)
        count += 1
utils.py
					import cv2
import numpy as np

## TO STACK ALL THE IMAGES IN ONE WINDOW
def stackImages(imgArray, scale, lables=[]):
    rows = len(imgArray)
    cols = len(imgArray[0])
    rowsAvailable = isinstance(imgArray[0], list)
    width = imgArray[0][0].shape[1]
    height = imgArray[0][0].shape[0]
    if rowsAvailable:
        for x in range(0, rows):
            for y in range(0, cols):
                imgArray[x][y] = cv2.resize(imgArray[x][y], (0, 0), None, scale, scale)
                if len(imgArray[x][y].shape) == 2:
                    imgArray[x][y] = cv2.cvtColor(imgArray[x][y], cv2.COLOR_GRAY2BGR)
        imageBlank = np.zeros((height, width, 3), np.uint8)
        hor = [imageBlank] * rows
        hor_con = [imageBlank] * rows
        for x in range(0, rows):
            hor[x] = np.hstack(imgArray[x])
            hor_con[x] = np.concatenate(imgArray[x])
        ver = np.vstack(hor)
        ver_con = np.concatenate(hor)
    else:
        for x in range(0, rows):
            imgArray[x] = cv2.resize(imgArray[x], (0, 0), None, scale, scale)
            if len(imgArray[x].shape) == 2:
                imgArray[x] = cv2.cvtColor(imgArray[x], cv2.COLOR_GRAY2BGR)
        hor = np.hstack(imgArray)
        hor_con = np.concatenate(imgArray)
        ver = hor
    if len(lables) != 0:
        eachImgWidth = int(ver.shape[1] / cols)
        eachImgHeight = int(ver.shape[0] / rows)
        # print(eachImgHeight)
        for d in range(0, rows):
            for c in range(0, cols):
                cv2.rectangle(ver, (c * eachImgWidth, eachImgHeight * d),
                              (c * eachImgWidth + len(lables[d][c]) * 13 + 27, 30 + eachImgHeight * d),
                              (255, 255, 255), cv2.FILLED)
                cv2.putText(ver, lables[d][c], (eachImgWidth * c + 10, eachImgHeight * d + 20),
                            cv2.FONT_HERSHEY_COMPLEX, 0.7, (255, 0, 255), 2)
    return ver

def reorder(myPoints):
    myPoints = myPoints.reshape((4, 2))  # REMOVE EXTRA BRACKET
    print(myPoints)
    myPointsNew = np.zeros((4, 1, 2), np.int32)  # NEW MATRIX WITH ARRANGED POINTS
    add = myPoints.sum(1)
    print(add)
    print(np.argmax(add))
    myPointsNew[0] = myPoints[np.argmin(add)]  # [0,0]
    myPointsNew[3] = myPoints[np.argmax(add)]  # [w,h]
    diff = np.diff(myPoints, axis=1)
    myPointsNew[1] = myPoints[np.argmin(diff)]  # [w,0]
    myPointsNew[2] = myPoints[np.argmax(diff)]  # [h,0]

    return myPointsNew

def rectContour(contours):
    rectCon = []
    max_area = 0
    for i in contours:
        area = cv2.contourArea(i)
        if area > 50:
            peri = cv2.arcLength(i, True)
            approx = cv2.approxPolyDP(i, 0.02 * peri, True)
            if len(approx) == 4:
                rectCon.append(i)
    rectCon = sorted(rectCon, key=cv2.contourArea, reverse=True)
    # print(len(rectCon))
    return rectCon

def getCornerPoints(cont):
    peri = cv2.arcLength(cont, True)  # LENGTH OF CONTOUR
    approx = cv2.approxPolyDP(cont, 0.02 * peri, True)  # APPROXIMATE THE POLY TO GET CORNER POINTS
    return approx

def splitBoxes(img):
    rows = np.vsplit(img, 5)
    boxes = []
    for r in rows:
        cols = np.hsplit(r, 5)
        for box in cols:
            boxes.append(box)
    return boxes

def drawGrid(img, questions=5, choices=5):
    secW = int(img.shape[1] / questions)
    secH = int(img.shape[0] / choices)
    for i in range(0, 9):
        pt1 = (0, secH * i)
        pt2 = (img.shape[1], secH * i)
        pt3 = (secW * i, 0)
        pt4 = (secW * i, img.shape[0])
        cv2.line(img, pt1, pt2, (255, 255, 0), 2)
        cv2.line(img, pt3, pt4, (255, 255, 0), 2)

    return img

def showAnswers(img, myIndex, grading, ans, questions=5, choices=5):
    secW = int(img.shape[1] / questions)
    secH = int(img.shape[0] / choices)

    for x in range(0, questions):
        myAns = myIndex[x]
        cX = (myAns * secW) + secW // 2
        cY = (x * secH) + secH // 2
        if grading[x] == 1:
            myColor = (0, 255, 0)
            # cv2.rectangle(img, (myAns * secW, x * secH), ((myAns * secW) + secW, (x * secH) + secH), myColor, cv2.FILLED)
            cv2.circle(img, (cX, cY), 50, myColor, cv2.FILLED)
        else:
            myColor = (0, 0, 255)
            # cv2.rectangle(img, (myAns * secW, x * secH), ((myAns * secW) + secW, (x * secH) + secH), myColor, cv2.FILLED)
            cv2.circle(img, (cX, cY), 50, myColor, cv2.FILLED)

        # CORRECT ANSWER
        myColor = (0, 255, 0)
        correctAns = ans[x]
        cv2.circle(img, ((correctAns * secW) + secW // 2, (x * secH) + secH // 2),
                   20, myColor, cv2.FILLED)
Here Is Your Code Link From Where You Can Access or Copy The Code :-
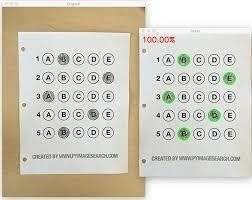
Output :
After Running the Code , You Will See The Output Like This .


Find More Projects

URL Shortener Using Python Django Introduction: Long URLs can be shortened into short, shareable links with the help of the URL Shortener …

User Authentication System Using Python Django Introduction: The implementation of safe and adaptable user authentication in Django is the main goal of …

The E-Learning System using Java with a Graphical User Interface (GUI) Introduction The E-Learning System is developed using Java (with a Graphical …

Weather App Using Python Django Introduction: When a user enters the name of a city, the Weather App retrieves current weather information. …

Quiz App Using Python Django Introduction: Users can take quizzes in a variety of subjects, see their results, and monitor their progress …

resume screener in python using python introduction The hiring process often begins with reviewing numerous resumes to filter out the most suitable …
Get Huge Discounts

More Python Projects
