
COVID 19 Hospital Management Using Python [Django Framework]
Introduction:
The COVID-19 Hospital Management is a Python-based application that tracks web applications for Hospitals. This project helps the management to store the patient’s details and accordingly assign the bed to patients. It is created with the help of the Django framework. Elaborating more about the Django framework, Django is a free, open-source web application framework written in Python that helps developers build websites and web applications more quickly and efficiently. The system is built by focusing on helping the management which can be counted as a security purpose, as the access is only with the management. It is a short project which can be useful for beginners to learn the flow of the Django framework.
Features of the COVID-19 Hospital Management:
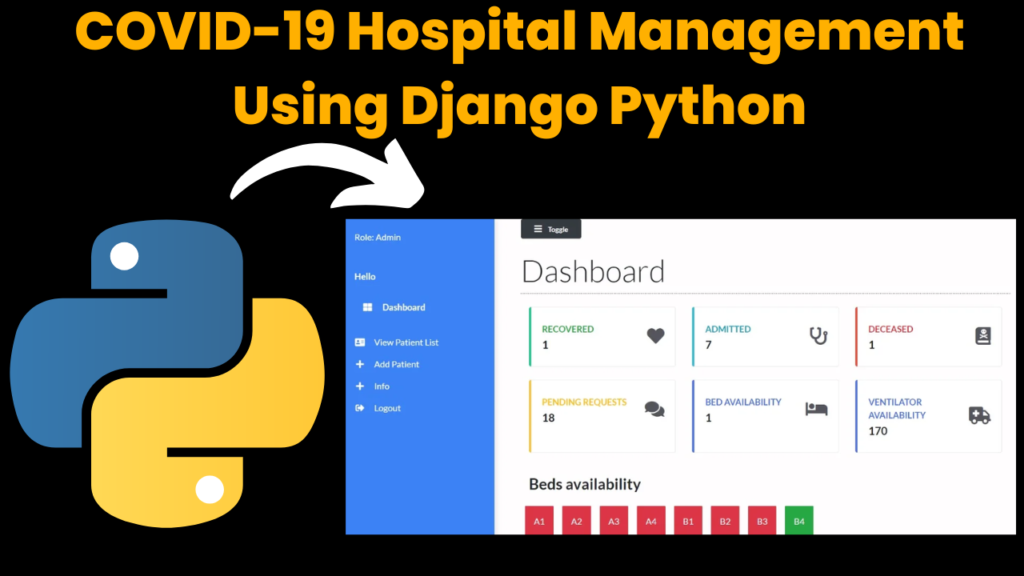
- Dashboard: On running the application, a dashboard where management can see the status of recovered, admitted, deceased patients and bed availability.
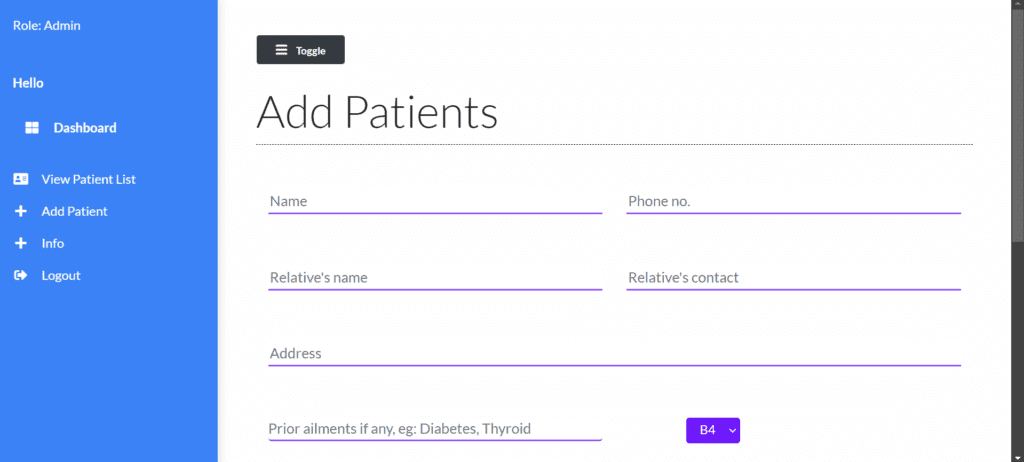
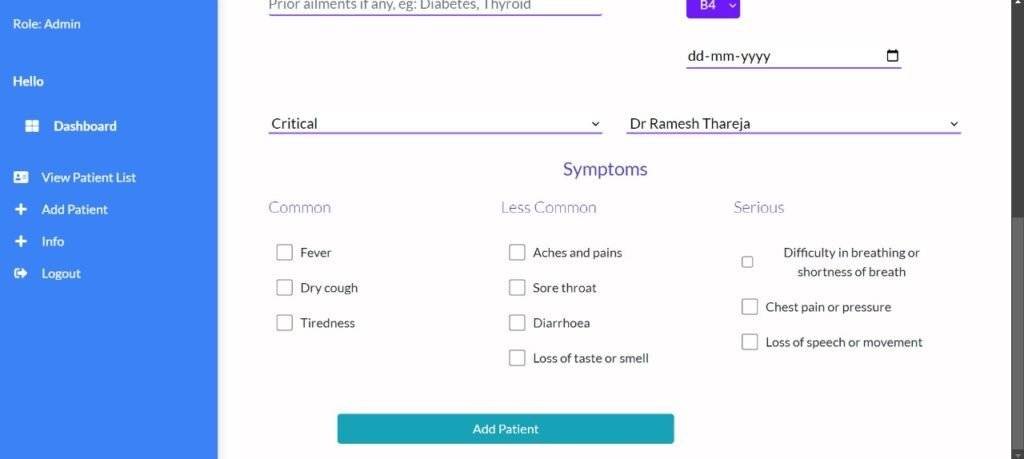
- Add Patients: Users can add new patients by filling out the form with relevant details.
- Update Details: The system allows management to modify existing details.
- Information Page: An attractive Home Page to share some details about the topic.
Required Modules or Packages:
The system was developed using Django, which is a Python-based framework used for developing web applications quickly and efficiently. Below are the essential steps required to be done for this project:
Django:
- You need to install Django in your system.
- Installation:
pip install django
- To verify the installation:
django-admin --versionVirtual Environment:
- It is suggested to use a dedicated virtual environment for each Django Project.
- Virtual Environment is a self-contained directory tree that contains a Python installation for a particular version of Python, plus many additional packages.
- Before creating a virtual environment, we need to carry out the installation process.
pip install virtualenv- After installation, we need to create the virtual environment.
- The module used to create and manage virtual environments is called venv.
- Command:
python -m venv "environment_name"How to Build a Django Project:
Once you have installed all the dependencies needed there are a few steps that need to be carried out to build the Django Project. Below are the essential steps:
Activate the Virtual Environment:
- Before start working on the project, there is a need to activate the Virtual Environment.
- There are a number of ways to do so, but to activate it on the terminal the command is:
"environment_name"-env\Scripts\activatenvironment_name"
Start the Project:
- After activation of the virtual Environment, we need to create the project.
- Command:
django-admin startproject "project_name"Run the Project:
- Now that you have a Django project, you can run it, and see what it looks like in a browser.
- Command:
python manage.py runserverCreate the App:
- An app is a web application that has a specific meaning in your project, like a home page, a contact form, or a members database.
- Command:
py manage.py startapp "app_name"How to Run the Code:
Follow the steps below to run the COVID-19 Hospital Management on your machine:
Download Django:
- Make sure Django is installed.
Extract the Project:
- Extract the downloaded ZIP file containing the project.
Open the Project:
- Navigate to the project folder and open it.
Create a Superuser for Administrative Access:
- Run the command, “python manage.py createsuperuser” , it will ask for some necessary details like email, username and password.
- A superuser is required to get full access to the admin panel, which is an interface for managing the database, users, permissions, and content of the application.
- Run the project:
- Run the command “python manage.py runserver” on the terminal.
Code Explanation:
The following sections explain some important parts of the code used in the COVID-19 Hospital Management:
Setting Up the Project:
- When we create the project in Django, several files like settings.py, asgi.py etc. are automatically generated. These files are necessary for setting up and running the project.
- Each Django project needs configuration settings, URL routing, and a way to interface with web servers. Files like settings.py, urls.py, asgi.py and wsgi.py lay the foundation for handling such tasks respectively.
- manage.py is a command-line utility for managing your Django project. It allows you to run server commands like starting the server, creating migrations, and more.
Start the App:
- When we start a new app in Django, several essential files like models.py, views.py, urls.py, admin.py, and others are within the app’s directory. These files are necessary for defining the core components of your app.
- models.py is to define the database models. Django is an ORM (Object-Relational Mapping) framework, and models.py allows you to define your data schema as Python classes
- views.py is where you define your app’s views, which are the logic that handles requests and returns responses (usually HTML, JSON, etc.). Django follows the MVT (Model-View-Template) architecture. views.py handles the business logic of your app by interacting with models, templates, and URL routing.
- urls.py is used to define the URL patterns for the app, mapping specific URLs to views.
Static Directories:
- In Django, the resources are not dynamically generated but are required to render the front end of a website. All the CSS, JS and images needed in this project are saved under the “static” folder.
Elements of the Project:
- User sends Request: When a user clicks the link, the browser sends an HTTP request to the Django web application, while launching this project the user comes to the dashboard after-login page.
- Authentication and Authorization: In views.py, there is a function named “login”, this function is used to authenticate the username and password provided by the user and accordingly authorize the user.
- Dashboard: Once the user is logged in successfully, a dashboard will appear giving information about the status of recovered, admitted, deceased patients and bed availability.
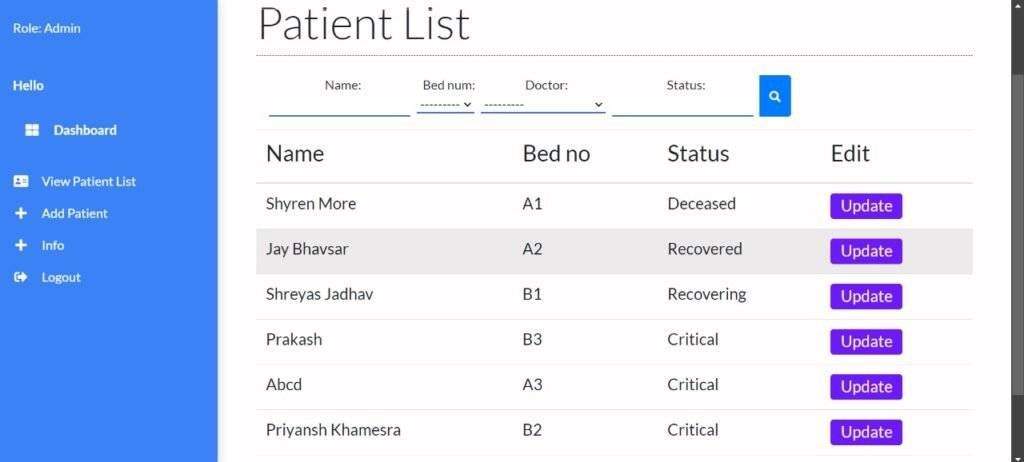
- To view the Patient List: At the side menu of the dashboard, the user has the option to view the list of all the registered patients including name, status, bed no and an option to update their details. Also, there is an option to search by applying needed filters accordingly.
- Update Patient Details: You need to click the button in front of the patient’s name whose details we need to update, upon clicking that button, it will redirect it to the form, where you can make the necessary changes and save the form again.
- To Add the Patient: At the side menu of the dashboard, there is an option to add the patient. Upon clicking this option, it will trigger the “add_patient” function in views.py , which will display a form and you can fill out the relevant details and save the information.
- Logout: If any user wants to logout, he/she can click upon the logout at the side menu on the dashboard and it will trigger the function “logout” in “views.py”.
Get Discount on Top Educational Courses
Source Code:
Providing a few essential Python files under this section, to get all the essential files, click on the download button below.
views.py
					from django.shortcuts import render, redirect
from django.http import HttpResponse, JsonResponse
from .models import *
from .filters import PatientFilter
from django.contrib.auth.models import User, auth
from django.contrib import messages
from django.contrib.auth.decorators import login_required
# PatientFilter = OrderFilter

# Create your vie

def login(request):
    if request.user.is_authenticated:
        return redirect('/')
    else:
        if request.method == 'POST':
            username = request.POST['username']
            password = request.POST['password']
            user = auth.authenticate(username=username, password=password)
            if user is not None:
                auth.login(request, user)
                return redirect('/')
            else:
                messages.error(request, 'Invalid username or password')
                return redirect('login')
        else:
            return render(request, 'main/login.html')


@login_required(login_url='login')
def logout(request):
    auth.logout(request)
    return redirect('/')


def dashboard(request):
    patients = Patient.objects.all()
    patient_count = patients.count()
    patients_recovered = Patient.objects.filter(status="Recovered")
    patients_deceased = Patient.objects.filter(status="Deceased")
    deceased_count = patients_deceased.count()
    recovered_count = patients_recovered.count()
    beds = Bed.objects.all()
    beds_available = Bed.objects.filter(occupied=False).count()
    context = {
        'patient_count': patient_count,
        'recovered_count': recovered_count,
        'beds_available': beds_available,
        'deceased_count':deceased_count,
        'beds':beds
    }
    print(patient_count)
    return render(request, 'main/dashboard.html', context)

def add_patient(request):
    beds = Bed.objects.filter(occupied=False)
    doctors = Doctor.objects.all()
    if request.method == "POST":
        name = request.POST['name']
        phone_num = request.POST['phone_num']
        patient_relative_name = request.POST['patient_relative_name']
        patient_relative_contact = request.POST['patient_relative_contact']
        address = request.POST['address']
        symptoms = request.POST['symptoms']
        prior_ailments = request.POST['prior_ailments']
        bed_num_sent = request.POST['bed_num']
        bed_num = Bed.objects.get(bed_number=bed_num_sent)
        dob = request.POST['dob']
        status = request.POST['status']
        doctor = request.POST['doctor']
        doctor = Doctor.objects.get(name=doctor)
        print(request.POST)
        patient = Patient.objects.create(
            name = name,
        phone_num = phone_num,
        patient_relative_name = patient_relative_name,
        patient_relative_contact = patient_relative_contact,
        address = address,
        symptoms = symptoms,
        prior_ailments = prior_ailments,
        bed_num = bed_num,
        dob = dob,
        doctor=doctor,
        status = status
        )
        patient.save()

        bed = Bed.objects.get(bed_number=bed_num_sent)
        bed.occupied = True
        bed.save()
        id = patient.id
        return redirect(f"/patient/{id}")

    context = {
        'beds': beds,
        'doctors': doctors
    }
    return render(request, 'main/add_patient.html', context)

def patient(request, pk):
    patient = Patient.objects.get(id=pk)
    if request.method == "POST":
        doctor = request.POST['doctor']
        doctor_time = request.POST['doctor_time']
        doctor_notes = request.POST['doctor_notes']
        mobile = request.POST['mobile']
        mobile2 = request.POST['mobile2']
        relativeName = request.POST['relativeName']
        address  = request.POST['location']
        print(doctor_time)
        print(doctor_notes)
        status = request.POST['status']
        doctor = Doctor.objects.get(name=doctor)
        print(doctor)
        patient.phone_num = mobile
        patient.patient_relative_contact = mobile2
        patient.patient_relative_name = relativeName
        patient.address = address
        patient.doctor = doctor
        patient.doctors_visiting_time = doctor_time
        patient.doctors_notes = doctor_notes
        print(patient.doctors_visiting_time)
        print(patient.doctors_notes)
        patient.status = status
        patient.save()
    context = {
        'patient': patient
    }
    return render(request, 'main/patient.html', context)


def patient_list(request):
    patients = Patient.objects.all()

    # filtering
    myFilter = PatientFilter(request.GET, queryset=patients)

    patients = myFilter.qs
    context = {
        'patients': patients,
        'myFilter': myFilter
    }

    return render(request, 'main/patient_list.html', context)

'''
def autocomplete(request):
    if patient in request.GET:
        name = Patient.objects.filter(name__icontains=request.GET.get(patient))
        name = ['js', 'python']

        names = list()
        names.append('Shyren')
        print(names)
        for patient_name in name:
            names.append(patient_name.name)
        return JsonResponse(names, safe=False)
    return render (request, 'main/patient_list.html')
'''

def autosuggest(request):
    query_original = request.GET.get('term')
    queryset = Patient.objects.filter(name__icontains=query_original)
    mylist = []
    mylist += [x.name for x in queryset]
    return JsonResponse(mylist, safe=False)

def autodoctor(request):
    query_original = request.GET.get('term')
    queryset = Doctor.objects.filter(name__icontains=query_original)
    mylist = []
    mylist += [x.name for x in queryset]
    return JsonResponse(mylist, safe=False)

def info(request):
    return render(request, "main/info.html")
urls.py
					from django.urls import path
from . import views
from .views import autosuggest
urlpatterns = [
    # path("", views.index, name="index"),
    path("", views.dashboard, name="dashboard"),
    path("login/", views.login, name="login"),
    path('logout', views.logout, name='logout'),
    path("add_patient/", views.add_patient, name="add_patient"),
    path("patient_list/", views.patient_list, name="patient_list"),
    path("patient/", views.patient, name="patient"),
    path("autosuggest/", views.autosuggest, name="autosuggest"),
    path("autodoctor/", views.autodoctor, name="autodoctor"),
    path("info/", views.info, name="info"),
]
Output:

More Projects:
URL Shortener Using Python Django
URL Shortener Using Python Django Introduction: Long URLs can be shortened into short, shareable links with the help of the URL Shortener project. Though it
User Authentication System Using Python Django
User Authentication System Using Python Django Introduction: The implementation of safe and adaptable user authentication in Django is the main goal of this project. It
E-Learning System Using JAVA
The E-Learning System using Java with a Graphical User Interface (GUI) Introduction The E-Learning System is developed using Java (with a Graphical User interface through

Weather App Using Python Django with Source Code
Weather App Using Python Django Introduction: When a user enters the name of a city, the Weather App retrieves current weather information. It provides temperature,
Quiz App Using Python Django with complete source code
Quiz App Using Python Django Introduction: Users can take quizzes in a variety of subjects, see their results, and monitor their progress with the Django
Resume Screener in python using GUI
resume screener in python using python introduction The hiring process often begins with reviewing numerous resumes to filter out the most suitable candidates for a
Get Huge Discounts

More Python Projects
