
Build A WhatsApp Bot Using Python With Source Code

Introduction :
In this article, we will learn how to Build A WhatsApp Bot Using Python Bot using Python. A WhatsApp bot is a software application capable of communicating with users in both written and spoken formats. Our bot will use the Twilio API to connect with WhatsApp and perform tasks like sending and receiving messages, notifications, and more.
We’ll use the Python library Flask to handle incoming and outgoing messages and Ngrok to expose our Flask application to the public internet so that Twilio can communicate with it.
Required Modules and Packages:
To build this WhatsApp bot, you will need the following:
- A Twilio Account: Sign up at Twilio and get a phone number with WhatsApp enabled.
- Python 3.9 or Newer: Make sure you have Python installed on your system.
- Flask: A lightweight web framework for Python that will be used to handle incoming HTTP requests from Twilio.
- Ngrok: A tool that will help expose your Flask application running on your local machine to the internet.
How To Run The Code :
Follow these steps to set up and run the WhatsApp bot:
Step 1: Set up a Twilio account by visiting Twilio WhatsApp. Sign up and verify your email ID and phone number.
Step 2: Once logged in, navigate to the Develop section in the left menu, select Messaging, and then choose Try it out -> Send a WhatsApp message. This will take you to a page for setting up the WhatsApp Sandbox.
Step 3: Configure the WhatsApp Sandbox by sending a message to the provided WhatsApp number (+14155238886) with a unique security code like join <secret-code>.
Step 4: Once you send the security code, you will receive a confirmation message in WhatsApp.
Step 5: Open the terminal and run the following commands to create a directory for the bot, set up a virtual environment, and install the required packages:
Create a Directory and Navigate to It:
mkdir whatsapp-bot && cd whatsapp-botCreate and Activate a Python Virtual Environment:
python3 -m venv bot-env && source bot-env/bin/activateInstall Twilio, Flask, and Requests:
pip install twilio flask requests
Get Discount on Top Educational Courses
Source Code:
Here is the Python script to create the WhatsApp bot. Make sure you have installed the necessary modules listed above. The script uses Flask to create a web server that listens for incoming messages from WhatsApp via the Twilio API.
					from flask import Flask, request
from twilio.twiml.messaging_response import MessagingResponse
import requests
from googlesearch import search  # Additional import for google search

# Initialize Flask app
app = Flask(__name__)

# Define bot response logic
@app.route("/bot", methods=['POST'])
def bot():
    # Get user message
    user_msg = request.values.get('Body', '').lower()

    # Create Twilio Messaging Response
    response = MessagingResponse()

    # Check for user query and respond
    if 'help' in user_msg:
        msg = response.message("This is a WhatsApp bot to provide quick answers! Please type your query to get started.")
    else:
        # Perform a Google search for the user's query
        result = []
        for i in search(user_msg, num=5, stop=5, pause=2):
            result.append(i)

        # Send the search results back to the user
        msg = response.message("\n".join(result))

    return str(response)

# Run Flask app
if __name__ == "__main__":
    app.run(port=5000, debug=True)
Improved Code Details
Flask Setup: The script initializes a Flask application and sets up a single route
/botthat listens for incoming HTTP POST requests from Twilio.Receiving Messages: The script captures the incoming message from WhatsApp using
request.values.get('Body', '')and stores it in theuser_msgvariable.Responding to Messages: The script checks if the user’s message contains certain keywords (like ‘help’) and responds with predefined messages. If the user asks a specific question, the script performs a Google search using the
googlesearchpackage to find the top 5 relevant URLs and sends them back to the user.Sending Responses: The
MessagingResponseobject from the Twilio library is used to send the response back to WhatsApp.
How to Run the Bot
Run the Python Script:
python main.pyStart Ngrok Server: In a separate terminal window, run:
ngrok http 5000This command will expose the Flask application to the internet, allowing Twilio to connect to it.
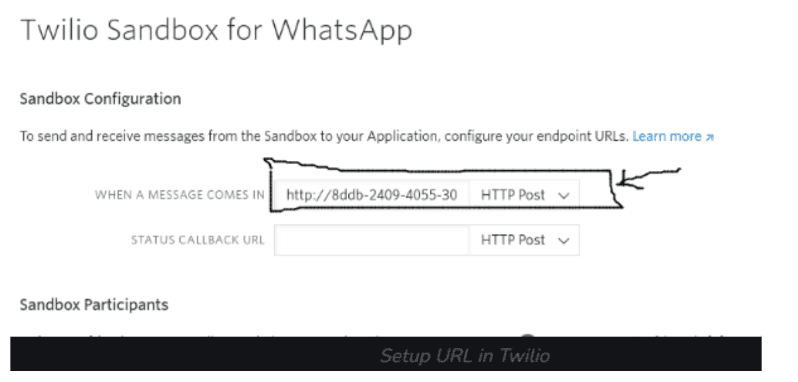
Set Up the Forwarding URL: Copy the forwarding URL provided by Ngrok (it will look like
http://<random-string>.ngrok.io) and paste it into the WhatsApp Sandbox settings at Twilio Sandbox Settings.
Testing the WhatsApp Bot
Now that everything is set up, send a WhatsApp message to the Twilio number. The bot will receive your message, perform a Google search for the text you sent, and reply with the top 5 results.
Conclusion
Congratulations! You have successfully built a WhatsApp bot using Python, Flask, and Twilio. This bot can receive messages, perform tasks like web searches, and send automated responses. You can further expand the bot’s capabilities by adding more complex logic, integrating it with different APIs, or connecting it to a database to store user data.
Find More Projects

URL Shortener Using Python Django Introduction: Long URLs can be shortened into short, shareable links with the help of the URL Shortener …

User Authentication System Using Python Django Introduction: The implementation of safe and adaptable user authentication in Django is the main goal of …

The E-Learning System using Java with a Graphical User Interface (GUI) Introduction The E-Learning System is developed using Java (with a Graphical …

Weather App Using Python Django Introduction: When a user enters the name of a city, the Weather App retrieves current weather information. …

Quiz App Using Python Django Introduction: Users can take quizzes in a variety of subjects, see their results, and monitor their progress …

resume screener in python using python introduction The hiring process often begins with reviewing numerous resumes to filter out the most suitable …
Get Huge Discounts

More Python Projects
