
Quiz App Using Python Django
Introduction:
Users can take quizzes in a variety of subjects, see their results, and monitor their progress with the Django Quiz App. Using the Django admin panel, administrators can add questions, options, and accurate responses.
After choosing a topic or degree of difficulty, users go to the quiz page and respond to multiple-choice questions. After submission, the app determines their score and presents the results along with any necessary explanations or accurate responses.
Text, options (A, B, C, and D), and the right answer are all stored in each question model. Views manage the scoring and logic of the quiz. Timed tests, result charts, and question randomization are optional features.
The user interface is clear, question-focused, and easy to use. Leaderboard features and color-coded feedback can improve it. This app eliminates the need for online tests, which is perfect for training, education, and interview preparation. Numerous Django fundamentals, including dynamic forms, session storage, and model relationships, are also taught.
The way that educational features are connected to real-time data is what makes it special. It can be transformed into a complete LMS (Learning Management System) module with a few adjustments.
Required Modules or Packages:
Python 3.8+: Make sure you have Python version 3.8 or higher installed on your system.
Django 3.x or 4.x: You’ll need the Django framework, version 3.x or 4.x, to build and run the system.
pip: This is the Python package manager that you’ll use to install the required libraries and packages.
You can install the core requirements with:
pip install django
pip install -r requirements.txt
How to Run the Code:
Follow these steps to launch the application locally:
✅ STEP 1: Download or Clone the Project
Option A: If you have a ZIP file
1. Extract it to a folder.
2. Open that folder in VS Code:
VS Code → File → Open Folder…
Option B: If using Git clone
git clone https://github.com/username/repository-name.git
cd repository-name
code .
✅ STEP 2: Set Up Virtual Environment
This keeps your project dependencies isolated.
# Create virtual environment (in project folder)
python -m venv venv
# Activate it:
# On Windows:
venv\Scripts\activate
# On macOS/Linux:
source venv/bin/activate
✅ STEP 3: Install Requirements
Most Django projects have a requirements.txt file. Install the packages:
pip install -r requirements.txt
If requirements.txt is missing, you can manually install Django:
pip install django
✅ STEP 4: Configure .env or Settings (If Required)
Some projects require .env files (for secret keys or DB settings).
Check the README or .env.example if present, and create your own .env.
✅ STEP 5: Run Migrations
python manage.py makemigrations
python manage.py migrate
✅ STEP 6: Create Superuser (for Admin Login)
python manage.py createsuperuser
Follow the prompts.
✅ STEP 7: Run the Django Development Server
python manage.py runserver
Open http://127.0.0.1:8000 in your browser.
Use /admin to access the admin panel.
Code Explanation:
1. Model Definition in models.py
class Question(models.Model):
question = models.CharField(max_length=500)
option1 = models.CharField(max_length=200)
option2 = models.CharField(max_length=200)
option3 = models.CharField(max_length=200)
option4 = models.CharField(max_length=200)
answer = models.CharField(max_length=200)
The Question model stores:
The question text
Four possible options
The correct answer (as string matching one of the options)
This data is used to dynamically generate the quiz form.
2. Quiz Form Handling in views.py
def index(request):
questions = Question.objects.all()
if request.method == "POST":
score = 0
for q in questions:
selected = request.POST.get(str(q.id))
if selected == q.answer:
score += 1
return render(request, 'result.html', {'score': score, 'total': len(questions)})
return render(request, 'index.html', {'questions': questions})
If POST request is detected, it iterates through the submitted answers.
Compares each response with the correct one (q.answer) and increments the score.
Renders a results page with the total score.
3. Quiz UI in index.html
<form method="POST">
{% csrf_token %}
{% for q in questions %}
<p>{{ q.question }}</p>
<input type="radio" name="{{ q.id }}" value="{{ q.option1 }}"> {{ q.option1 }}<br>
<input type="radio" name="{{ q.id }}" value="{{ q.option2 }}"> {{ q.option2 }}<br>
<input type="radio" name="{{ q.id }}" value="{{ q.option3 }}"> {{ q.option3 }}<br>
<input type="radio" name="{{ q.id }}" value="{{ q.option4 }}"> {{ q.option4 }}<br>
{% endfor %}
<button type="submit">Submit</button>
</form>
Dynamically renders each question with 4 radio button choices.
Uses Django template syntax to loop through questions.
4. Score Display in result.html
<h2>Your Score: {{ score }}/{{ total }}</h2>Simply displays the final score after submission.
Source Code:
To explore the full source code, click the button below to download the ZIP file and run it on your local machine:
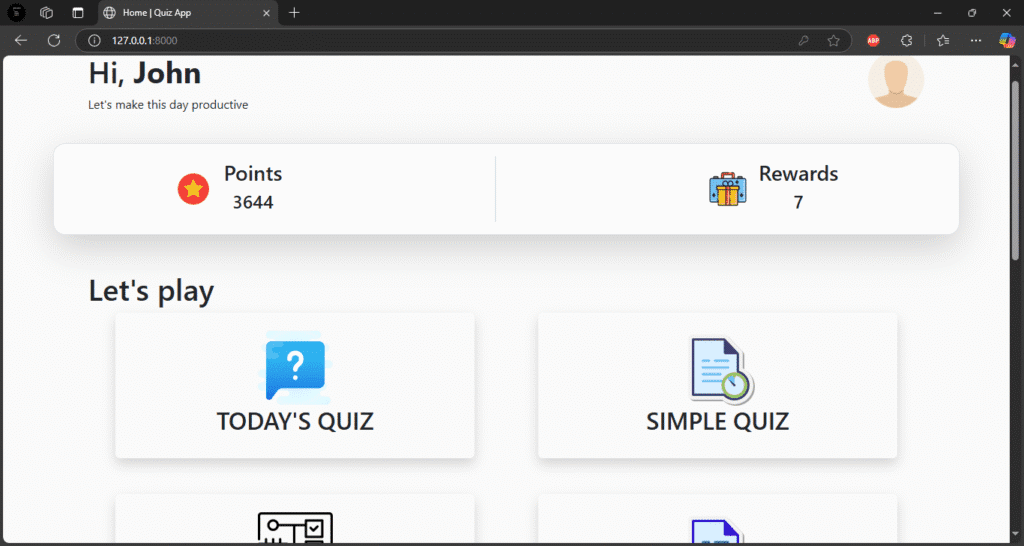
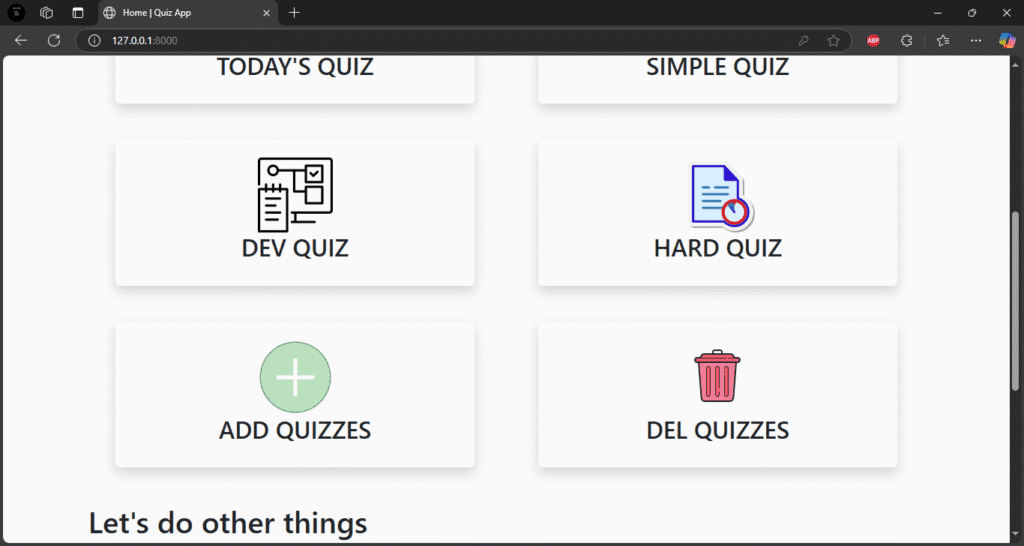
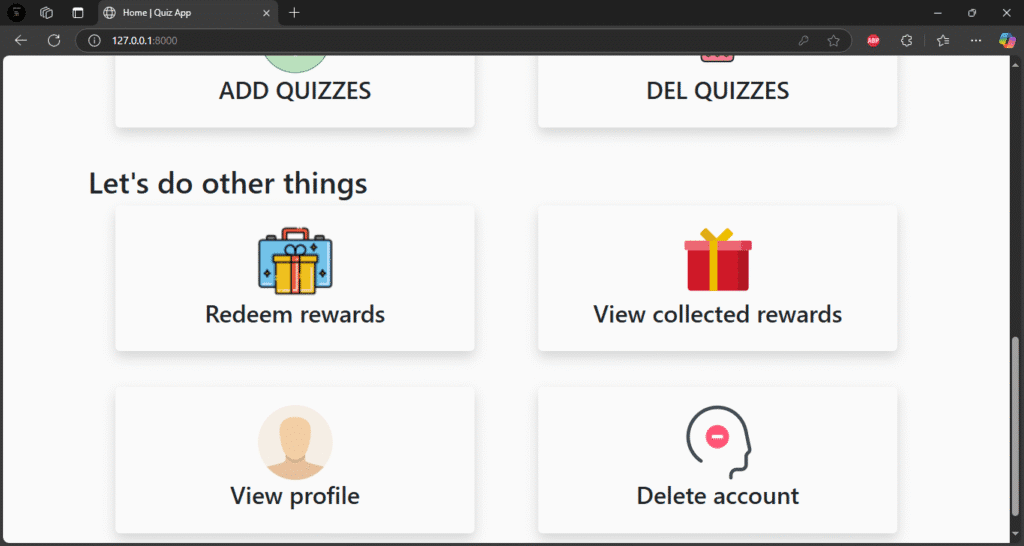
Output:
Get Huge Discounts

More Python Projects
