
Object Measurement Using Open CV Python With Source Code
Introduction :
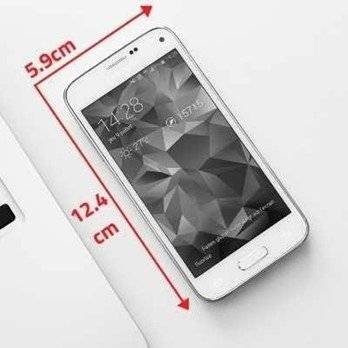
The Object Measurement with OpenCV uses computer vision to estimate the dimensions of objects in an image. This is most commonly used in manufacturing and robotics as well as medical imaging, where precision measurement are very important. OpenCV is an open-source computer vision library that lets you process images and extract meaningful information from them. This often involves snapping a quick image of the object and marking off important features/edges, before running a suite of mathematical algorithms to measure things like distance (between each pair) height, width or even area. To calibrate the system of measurement, a known size reference
object is often used to confirm that it measures correctly. It is particularly useful in case of non-contact measurements, where physical touch can be difficult. In the modern age of industry and science, these repeated measurements can lead to human error being introduced leading to reduced efficiency — this is where automated processes like that offered by OpenCV come in!
Language And Interface :-
Object Measurement Using Python , A Versatile Programming Language With Source Code .
Required Modules Or Packages:-
You Need The Packages List Given Below :-
- Numpy :- It is a core library for numerical computation in python and it can handle large arrays of numbers.
- cv2 :- It is a library to use in Computer Vision You will get basic image processing tools while using cv2 for example, Image Reading and Writing .
- utils :- This Python library is a collection of utility functions, and classes that allow you to perform common tasks in a shorter amount code
How To Run The Code :-
Step 1 . First , You Download and Install Visual Studio Code or VS Code In your PC or Laptop by VS Code Official Website .
Step 2 . Now Open CMD As Administrator and install the above packages using pip .
Step 3 . Now Open Visual Studio Code .
Step 4. Now Make The files named as utils.py , ObjectMeasurement.py .
Step 5 . Now Copy And Paste The Code from the Link Given Below
Step 6 . After pasting The code , Save This & Click On Run Button .
Step 7 . Now You will See The Output .
Code Explanation :-
Contours: A python script using OpenCV and NumPy for contour Detection /
Manipulation – finds contours, reordering of points for perspective transformation, warp images based on some set . Those looked like this and here is what those functions do:
getContours :
Use: This function finds contours in an image, refines them by post-processing methods, and can optionally draw the derived contours on the input images.
Steps :-
- Turn Image to Greyscale
- Use Gaussian blur to remove
- Canny edge detection will help to find an edges of the
- The other solution apply a bridge to fill the gap, and then dichotomies called expanded
- Display also the processed image after edge detection (optional).
- Contours = findContours(processedImg, 1, 2)
- Contour filtering based on both its area and vertices amount (filter parameter fully controls the number of verts the contour should have).
- reorder
Use: it is used for reordering a set of 4 points to have them in top-left, top-right, bottom- left and bottom-right order according to their coordinates (to perform a perspective transformation)
Steps :-
- Convert the points to a 4×2 array
- Find the summation and differences in the coordinates of both
- Sort the points in sequence — top-left, to right-top, after that bottom left and at finally bottom-right.
Return : A new set of points reordered.
warpImg
Description: This function is used to warp an image using a perspective transformation from 4 points and returns the warpped image .
Steps:
- The points represented in the input (inFeature)are reordered with this function:
- Specify the destination points for
- Compute the transformation matrix for
- Apply The Transformation In Image .
Purpose: The function calculates the 2D space Euclidian distance between any two points.
Steps:
Take the second point of coordinates minus first point. Employ the Pythagorean theorem to find how far it is from one dot to another. Return: The distance between two points
Overall Workflow:
getContours for an image extracts and filters all of its contours.
reorder and warpImg reorders and warps images using the points found.
Get Discount on Top Educational Courses
Source Code :-
objectTracking.py
					import cv2

############### Tracker Types #####################

# tracker = cv2.TrackerBoosting_create()
# tracker = cv2.TrackerMIL_create()
# tracker = cv2.TrackerKCF_create()
# tracker = cv2.TrackerTLD_create()
# tracker = cv2.TrackerMedianFlow_create()
# tracker = cv2.TrackerCSRT_create()
tracker = cv2.TrackerMOSSE_create()

########################################################

cap = cv2.VideoCapture(1)
# TRACKER INITIALIZATION
success, frame = cap.read()
bbox = cv2.selectROI("Tracking", frame, False)
tracker.init(frame, bbox)

def drawBox(img, bbox):
    x, y, w, h = int(bbox[0]), int(bbox[1]), int(bbox[2]), int(bbox[3])
    cv2.rectangle(img, (x, y), (x + w, y + h), (255, 0, 255), 3, 3)
    cv2.putText(img, "Tracking", (100, 75), cv2.FONT_HERSHEY_SIMPLEX, 0.7, (0, 255, 0), 2)

while True:
    timer = cv2.getTickCount()
    success, img = cap.read()
    success, bbox = tracker.update(img)

    if success:
        drawBox(img, bbox)
    else:
        cv2.putText(img, "Lost", (100, 75), cv2.FONT_HERSHEY_SIMPLEX, 0.7, (0, 0, 255), 2)

    cv2.rectangle(img, (15, 15), (200, 90), (255, 0, 255), 2)
    cv2.putText(img, "Fps:", (20, 40), cv2.FONT_HERSHEY_SIMPLEX, 0.7, (255, 0, 255), 2)
    cv2.putText(img, "Status:", (20, 75), cv2.FONT_HERSHEY_SIMPLEX, 0.7, (255, 0, 255), 2)

    fps = cv2.getTickFrequency() / (cv2.getTickCount() - timer)
    if fps > 60:
        myColor = (20, 230, 20)
    elif fps > 20:
        myColor = (230, 20, 20)
    else:
        myColor = (20, 20, 230)

    cv2.putText(img, str(int(fps)), (75, 40), cv2.FONT_HERSHEY_SIMPLEX, 0.7, myColor, 2)

    cv2.imshow("Tracking", img)
    if cv2.waitKey(1) & 0xff == ord('q'):
        break
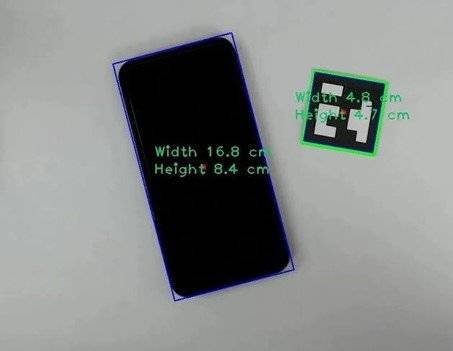
Output :
After Running the Code , You Will See The Output Like This

Find More Projects

URL Shortener Using Python Django Introduction: Long URLs can be shortened into short, shareable links with the help of the URL Shortener …

User Authentication System Using Python Django Introduction: The implementation of safe and adaptable user authentication in Django is the main goal of …

The E-Learning System using Java with a Graphical User Interface (GUI) Introduction The E-Learning System is developed using Java (with a Graphical …

Weather App Using Python Django Introduction: When a user enters the name of a city, the Weather App retrieves current weather information. …

Quiz App Using Python Django Introduction: Users can take quizzes in a variety of subjects, see their results, and monitor their progress …

resume screener in python using python introduction The hiring process often begins with reviewing numerous resumes to filter out the most suitable …
Get Huge Discounts

More Python Projects
