Google Search Clone using Python With Source Code

Introduction :
Creating your own Google Search clone might sound like a daunting task, but with Python, it becomes an exciting and educational journey. This blog will guide you through the process of developing a simple Google Search clone using Python and the Tkinter library for the graphical user interface (GUI). By the end of this tutorial, you’ll have a basic understanding of how search engines function and how you can leverage Python libraries to create useful applications.
In this project, we’ll build a minimalistic Google Search clone that can search for queries and display the results directly in the browser. We’ll use the googlesearch module to fetch the search results and Tkinter for the GUI. This project is a great way to practice Python programming, especially if you’re interested in web scraping and GUI development.
Explanation :
Python was chosen for its simplicity, readability, and powerful library support. Notable libraries include Tkinter for the GUI and Pillow for handling images, plus googlesearch-python to query Google.
Frontend Design:
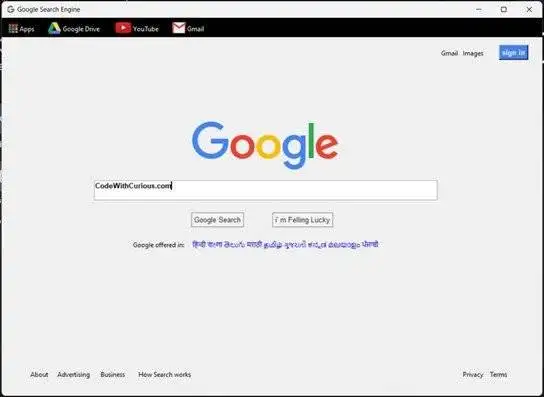
The application has a clean interface, minimalistic much to what Google has on its homepage. It is designed with Tkinter. This consists of a search box, buttons styled in accordance with the design of Google, along with links to services such as Gmail and YouTube that can be clicked and opened.
It is user-friendly; thus, easy to navigate and use. The interface design is responsive and user- friendly, mirroring the original Google experience in a close way. Customization: The interface is easily customizable to allow for personal branding or the expansion of features, making the project flexible and extensible.
Prerequisites :
Before diving into the code, ensure you have the following installed:
Python 3.x: Make sure Python is installed on your machine. You can download it from the official Python website.
Tkinter: Tkinter is a standard Python interface to the Tk GUI toolkit. It comes bundled with Python, so you don’t need to install it separately.
Pillow: This is a Python Imaging Library (PIL) fork that adds support for opening, manipulating, and saving many different image file formats.
Googlesearch-Python: This is a Python library that allows you to scrape Google search results easily.
Install the required packages using pip:
					pip install Pillow
pip install googlesearch-python
Setting Up the Environment:
Let’s start by importing the necessary libraries and setting up the basic structure for our application:
from tkinter import * import tkinter as tk import webbrowser
from PIL import ImageTk, Image from googlesearch import search
Here, we import the Tkinter library for the GUI, webbrowser to open the search results in the browser, Pillow to handle images, and googlesearch to perform the search operations.
Now let’s begins the Coding,
Get Discount on Top Educational Courses
					# Google Search Engine

# imported necessary libraries
from tkinter import *
import tkinter as tk
import webbrowser
from PIL import ImageTk, Image
from googlesearch import search

# created main window
root = tk.Tk()
root.title("Google Search Engine")
root.geometry("1000x700")
root.iconbitmap('Images/google_icon.ico')

# created a callback function to open linked web browser
def callback(url):
    webbrowser.open_new_tab(url)

# function defined to search any things in this google search engine
def search_query():
    query = text.get("1.0", "end-1c")
    s = search(query, tld="co.in", num=10, stop=1, pause=2)
    for j in s:
        print(webbrowser.open(j))

# label to create top black strip
l1 = Label(root, bg="black", width=500, height=2)
l1.grid(sticky="w")

# app logo added
apps_logo = ImageTk.PhotoImage(Image.open('Images/apps.jpg'))
apps_logo_lbl = Label(root, image=apps_logo, borderwidth=0)
apps_logo_lbl.place(x=13, y=11)
apps_lbl = Label(root, text="Apps", bg="black", fg="white", cursor="hand2")
apps_lbl.place(x=30, y=10)
apps_lbl.bind("", lambda e: callback("https://about.google/intl/en/products/"))

# google drive logo added
drive_logo = ImageTk.PhotoImage(Image.open('Images/Google drive.png'))
drive_logo_lbl = Label(root, image=drive_logo, borderwidth=0)
drive_logo_lbl.place(x=85, y=8)
drive_lbl = Label(root, text="Google Drive", bg="black", fg="white", cursor="hand2")
drive_lbl.place(x=110, y=10)
drive_lbl.bind("", lambda e: callback("https://drive.google.com/drive/u/0/my-drive"))

# youtube logo added
yt_logo = ImageTk.PhotoImage(Image.open('Images/youtube.png'))
yt_logo_lbl = Label(root, image=yt_logo, borderwidth=0)
yt_logo_lbl.place(x=210, y=8)
yt_lbl = Label(root, text="YouTube", bg="black", fg="white", cursor="hand2")
yt_lbl.place(x=240, y=10)
yt_lbl.bind("", lambda e: callback("https://www.youtube.com/"))

# gmail logo added
gmail_logo = ImageTk.PhotoImage(Image.open('Images/gmail.jpg'))
gmail_logo_lbl = Label(root, image=gmail_logo, borderwidth=0)
gmail_logo_lbl.place(x=315, y=8)
gmail_lbl = Label(root, text="Gmail", bg="black", fg="white", cursor="hand2")
gmail_lbl.place(x=340, y=10)
gmail_lbl.bind("", lambda e: callback("https://mail.google.com/mail/"))

# right gmail link
g_word = Label(root, text="Gmail", cursor="hand2")
g_word.place(x=810, y=55)
g_word.bind("", lambda e: callback("https://mail.google.com/mail/"))

# right images link
i_word = Label(root, text="Images", cursor="hand2")
i_word.place(x=850, y=55)
i_word.bind("", lambda e: callback("https://www.google.co.in/imghp?hl=en&tab=wi&ogbl"))

# created signin button
signinb = Button(root, text="sign in", font=('roboto', 10, 'bold'), bg="#4583EC", fg="white", cursor="hand2")
signinb.place(x=920, y=50)
signinb.bind("", lambda e: callback("https://accounts.google.com/signin/v2/identifier?hl=en&continue=https%3A%2F%2Fwww.google.com%2F&ec=GAlAmgQ&flowName=GlifWebSignIn&flowEntry=AddSession"))

# google big logo added
g_logo = ImageTk.PhotoImage(Image.open('Images/google logo.png'))
l2 = Label(root, image=g_logo)
l2.place(x=350, y=190)

# search entry box added
text = Text(root, width=90, height=2, relief=RIDGE, font=('roboto', 10, 'bold'), borderwidth=2)
text.place(x=170, y=300)

# search button added
search1 = Button(root, text="Google Search", relief=RIDGE, font=('arial', 10), bg="#F3F3F3", fg="#222222", cursor="hand2", command=search_query)
search1.place(x=350, y=360)

# Lucky Button added
lucky = Button(root, text="I' m Feeling Lucky", relief=RIDGE, font=('arial', 10), bg="#F3F3F3", fg="#222222", cursor="hand2")
lucky.place(x=500, y=360)
lucky.bind("", lambda e: callback("https://www.google.com/doodles"))

# different language offered label
offered = Label(root, text="Google offered in:")
offered.place(x=240, y=410)
lang = Label(root, text="हिंदी বাংলা తెలుగు मराठी தமிழ் ગુજરાતી ಕನ್ನಡ മലയാളം ਪੰਜਾਬੀ", fg="blue")
lang.place(x=350, y=410)

# About label
about_lbl = Label(root, text="About", cursor="hand2")
about_lbl.place(x=50, y=650)
about_lbl.bind("", lambda e: callback("https://about.google/?utm_source=google-IN&utm_medium=referral&utm_campaign=hp-footer&fg=1"))

# advertising label
ad_lbl = Label(root, text="Advertising", cursor="hand2")
ad_lbl.place(x=100, y=650)
ad_lbl.bind("", lambda e: callback("https://ads.google.com/intl/en_in/home/?subid=ww-ww-et-g-awa-a-g_hpafoot1_1!o2&utm_source=google.com&utm_medium=referral&utm_campaign=google_hpafooter&fg=1"))

# business label
business_lbl = Label(root, text="Business", cursor="hand2")
business_lbl.place(x=180, y=650)
business_lbl.bind("", lambda e: callback("https://www.google.com/intl/en_in/business/"))

# how search works label
search_work_lbl = Label(root, text="How Search works", cursor="hand2")
search_work_lbl.place(x=250, y=650)
search_work_lbl.bind("", lambda e: callback("https://www.google.com/search/howsearchworks/?fg=1"))

# privacy label
privacy_lbl = Label(root, text="Privacy", cursor="hand2")
privacy_lbl.place(x=850, y=650)
privacy_lbl.bind("", lambda e: callback("https://policies.google.com/privacy?hl=en-IN&fg=1"))

# terms label
terms_lbl = Label(root, text="Terms", cursor="hand2")
terms_lbl.place(x=900, y=650)
terms_lbl.bind("", lambda e: callback("https://policies.google.com/terms?hl=en-IN&fg=1"))

root.mainloop()
Code Explanation :
Creating the Main Window
The main window of our application will serve as the base where all widgets like buttons, labels, and text fields will be placed.
					root = tk.Tk()
root.title("Google Search Engine") root.geometry("1000x700") root.iconbitmap('Images/google_icon.ico')
tk.Tk() initializes the main application window.
title() sets the title of the window.
geometry() defines the size of the window.
iconbitmap() sets the window icon, in this case, a Google icon.
Defining the Search Functionality
Next, we define the core functionality of our search engine. This function retrieves the user’s input, performs a Google search, and opens the results in the default web browser.
					def search_query():
query = text.get("1.0","end-1c")
s = search(query, tld="co.in", num=10, stop=1, pause=2) for j in s:
print(webbrowser.open(j))
text.get(“1.0″,”end-1c”) fetches the user input from the text widget.
search() performs the Google search. We set tld=”co.in” for India, num=10 to limit results to 10, and pause=2 to introduce a delay between queries to avoid getting
blocked.
webbrowser.open(j) opens the search results in a new tab.
Designing the User Interface
The user interface includes the Google logo, a text box for entering queries, and buttons for search operations. Let’s break it down:
Top Black Strip
We start by adding a black strip at the top of the window, mimicking the header found on the Google homepage.
					l1 = Label(root, bg="black", width=500, height=2)
l1.grid(sticky="w")
Adding Google Logo and Search Box
Next, we place the Google logo and the text box where users can enter their search queries.
					g_logo = ImageTk.PhotoImage(Image.open('Images/google logo.png')) l2 = Label(root, image=g_logo)
l2.place(x=350, y=190)

text = Text(root, width=90, height=2, relief=RIDGE, font=('roboto', 10, 'bold'), borderwidth=2)
text.place(x=170, y=300)
Adding Search Buttons
Finally, we add buttons for “Google Search” and “I’m Feeling Lucky” functionalities
					search1 = Button(root, text="Google Search", relief=RIDGE, font=('arial', 10), bg="#F3F3F3", fg="#222222", cursor="hand2", command=search_query) search1.place(x=350, y=360)

lucky = Button(root, text="I'm Feeling Lucky", relief=RIDGE, font= ('arial', 10), bg="#F3F3F3", fg="#222222", cursor="hand2") lucky.place(x=500, y=360)
lucky.bind("", lambda e: callback("https://www.google.com/doodles"))
Adding Callback Functionality
Buttons like “Apps“, “YouTube“, “Gmail“, etc., are bound to URLs that open when clicked. This is done using the callback function:
def callback(url): webbrowser.open_new_tab(url)
Final Touches :
We can add more elements to make the UI look closer to the original Google homepage, such as language options, footer links, and more. Here’s how to add a few more elements:
					# Google Drive logo
drive_logo = ImageTk.PhotoImage(Image.open('Images/Google drive.png')) drive_logo_lbl = Label(root, image=drive_logo, borderwidth=0) drive_logo_lbl.place(x=85, y=8)
drive_lbl = Label(root, text="Google Drive", bg="black", fg="white", cursor="hand2")
drive_lbl.place(x=110, y=10) drive_lbl.bind("", lambda e:
callback("https://drive.google.com/drive/u/0/my-drive"))
This process is repeated for other elements like YouTube, Gmail, and language options.
Running the Application
python google_search.py
Note: Here I used google_search.py to run the code , please use your own script name.
Output :

Find More Projects
URL Shortener Using Python Django Introduction: Long URLs can be shortened into short, shareable links with the help of the URL Shortener …
User Authentication System Using Python Django Introduction: The implementation of safe and adaptable user authentication in Django is the main goal of …
The E-Learning System using Java with a Graphical User Interface (GUI) Introduction The E-Learning System is developed using Java (with a Graphical …
Weather App Using Python Django Introduction: When a user enters the name of a city, the Weather App retrieves current weather information. …
Quiz App Using Python Django Introduction: Users can take quizzes in a variety of subjects, see their results, and monitor their progress …
resume screener in python using python introduction The hiring process often begins with reviewing numerous resumes to filter out the most suitable …

