
Car Racing Game Using Python With Source Code
Introduction:
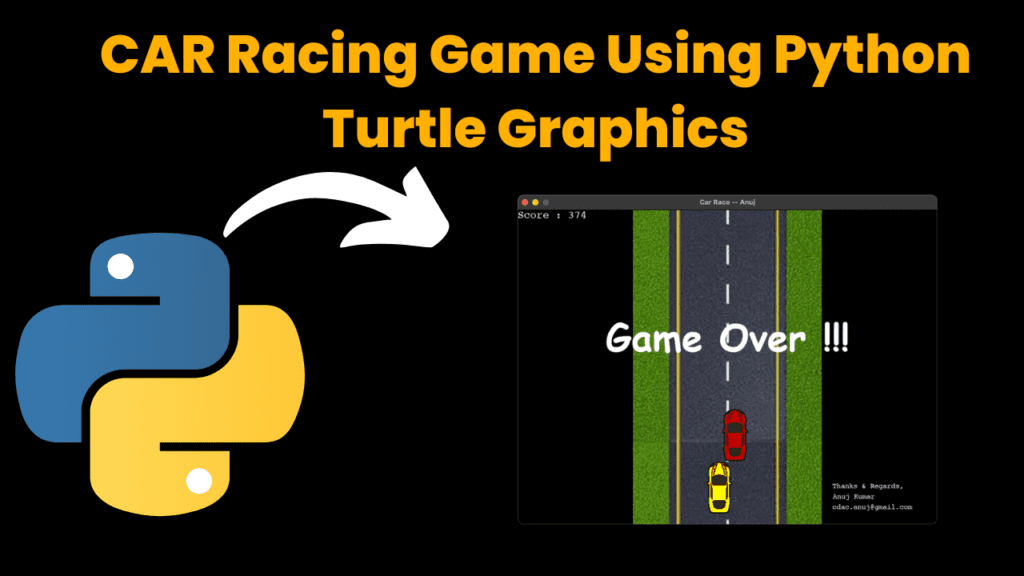
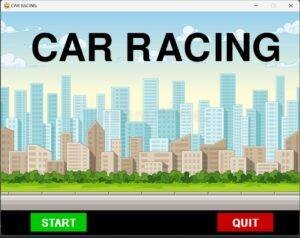
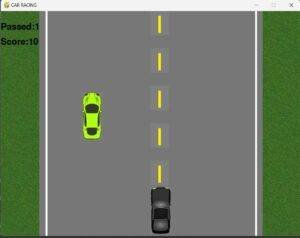
In this project, we have created a “Car Racing Game” by using the pygame module in Python. It is one of the most efficient libraries for game development using python. Starting with an introductory window providing two options that are, to start or to quit, to the user, following this, the user will control the movement of the vehicle accordingly and prevent it from crashing.
Explanation:
First of all, we will import all the necessary modules. For game development with python we will import the pygame module, for controlling the frames will import the time module, for getting random values random module will get used, and the last sys module.
After importing all the modules, we will initialize the pygame by using the “.init()” method. With this, we will create the game window and then set the caption for the one by using “pygame. display.set_mode()” & “pygame.display.set_caption()” respectively.
The main thing about any game development project is images. Under this project, to make it interactive and attractive we will use the following images:
- A background image
- Grass image
- White strip image
- Yellow strip image
- Car images
- Starting city image
Source Code:
Get Discount on Top Educational Courses
import random
from time import sleep

import pygame
from pathlib2 import Path


class CarRacing:
    def __init__(self):

        pygame.init()
        self.display_width = 800
        self.display_height = 600
        self.black = (0, 0, 0)
        self.white = (255, 255, 255)
        self.clock = pygame.time.Clock()
        self.gameDisplay = None
        self.root_path = str(Path(__file__).parent)

        self.initialize()

    def initialize(self):

        self.crashed = False

        self.carImg = pygame.image.load(self.root_path + "/img/car.png")
        self.car_x_coordinate = (self.display_width * 0.45)
        self.car_y_coordinate = (self.display_height * 0.8)
        self.car_width = 49

        # enemy_car
        self.enemy_car = pygame.image.load(self.root_path + "/img/enemy_car_1.png")
        self.enemy_car_startx = random.randrange(310, 450)
        self.enemy_car_starty = -600
        self.enemy_car_speed = 5
        self.enemy_car_width = 49
        self.enemy_car_height = 100

        # Background
        self.bgImg = pygame.image.load(self.root_path + "/img/back_ground.jpg")
        self.bg_x1 = (self.display_width / 2) - (360 / 2)
        self.bg_x2 = (self.display_width / 2) - (360 / 2)
        self.bg_y1 = 0
        self.bg_y2 = -600
        self.bg_speed = 3
        self.count = 0

    def car(self, car_x_coordinate, car_y_coordinate):
        self.gameDisplay.blit(self.carImg, (car_x_coordinate, car_y_coordinate))

    def racing_window(self):
        self.gameDisplay = pygame.display.set_mode((self.display_width, self.display_height))
        pygame.display.set_caption('Car Race -- Anuj')
        self.run_car()

    def run_car(self):

        while not self.crashed:

            for event in pygame.event.get():
                if event.type == pygame.QUIT:
                    self.crashed = True
                # print(event)

                if event.type == pygame.KEYDOWN:
                    if event.key == pygame.K_LEFT:
                        self.car_x_coordinate -= 50
                        print("CAR X COORDINATES: %s" % self.car_x_coordinate)
                    if event.key == pygame.K_RIGHT:
                        self.car_x_coordinate += 50
                        print("CAR X COORDINATES: %s" % self.car_x_coordinate)
                    print("x: {x}, y: {y}".format(x=self.car_x_coordinate, y=self.car_y_coordinate))

            self.gameDisplay.fill(self.black)
            self.back_ground_road()

            self.run_enemy_car(self.enemy_car_startx, self.enemy_car_starty)
            self.enemy_car_starty += self.enemy_car_speed

            if self.enemy_car_starty > self.display_height:
                self.enemy_car_starty = 0 - self.enemy_car_height
                self.enemy_car_startx = random.randrange(310, 450)

            self.car(self.car_x_coordinate, self.car_y_coordinate)
            self.highscore(self.count)
            self.count += 1
            if self.count % 100 == 0:
                self.enemy_car_speed += 1
                self.bg_speed += 1

            if self.car_y_coordinate < self.enemy_car_starty + self.enemy_car_height:
                if self.car_x_coordinate > self.enemy_car_startx and self.car_x_coordinate < self.enemy_car_startx + self.enemy_car_width or self.car_x_coordinate + self.car_width > self.enemy_car_startx and self.car_x_coordinate + self.car_width < self.enemy_car_startx + self.enemy_car_width:
                    self.crashed = True
                    self.display_message("Game Over !!!")

            if self.car_x_coordinate < 310 or self.car_x_coordinate > 460:
                self.crashed = True
                self.display_message("Game Over !!!")

            pygame.display.update()
            self.clock.tick(60)

    def display_message(self, msg):
        font = pygame.font.SysFont("comicsansms", 72, True)
        text = font.render(msg, True, (255, 255, 255))
        self.gameDisplay.blit(text, (400 - text.get_width() // 2, 240 - text.get_height() // 2))
        self.display_credit()
        pygame.display.update()
        self.clock.tick(60)
        sleep(1)
        car_racing.initialize()
        car_racing.racing_window()

    def back_ground_road(self):
        self.gameDisplay.blit(self.bgImg, (self.bg_x1, self.bg_y1))
        self.gameDisplay.blit(self.bgImg, (self.bg_x2, self.bg_y2))

        self.bg_y1 += self.bg_speed
        self.bg_y2 += self.bg_speed

        if self.bg_y1 >= self.display_height:
            self.bg_y1 = -600

        if self.bg_y2 >= self.display_height:
            self.bg_y2 = -600

    def run_enemy_car(self, thingx, thingy):
        self.gameDisplay.blit(self.enemy_car, (thingx, thingy))

    def highscore(self, count):
        font = pygame.font.SysFont("lucidaconsole", 20)
        text = font.render("Score : " + str(count), True, self.white)
        self.gameDisplay.blit(text, (0, 0))

    def display_credit(self):
        font = pygame.font.SysFont("lucidaconsole", 14)
        text = font.render("Thanks & Regards,", True, self.white)
        self.gameDisplay.blit(text, (600, 520))
        text = font.render("Anuj Kumar", True, self.white)
        self.gameDisplay.blit(text, (600, 540))
        text = font.render("cdac.anuj@gmail.com", True, self.white)
        self.gameDisplay.blit(text, (600, 560))


if __name__ == '__main__':
    car_racing = CarRacing()
    car_racing.racing_window()
By using “pygame.image.load(<filename>)” we will load all the images in the project. The next step is to blit the image over the screen to be seen and with the help of the “.blit()” function we will blit all the images under a user-defined function named “background()”. We will make another UDF and blit the car image at the coordinates to get the car image.
Continuing in this process, now we will initialize some variables.
- x,y,x_change,y_change : for the coordinates of user’s car
- op_speed: for setting the opponent car speed
- op_width,car_width & op_height: for the width and height of opponent cars
- obs,obs_x,obs_y: for the coordinates of opponent cars
- car_passed: for counting the no of cars passed
- level, score: for determining level and score
In the next step, we will create another UDF named “obstacle()” to show all the opponent cars on the screen. Under this function, we will load the image and then we will blit it by following the same procedure as mentioned above.
For displaying the score, first, we will create the font object by using “pygame.font.Sysfont()” and then we will render it by “.render()” and finally we will blit it on the screen. All of these functionalities will be executed under the UDF named “sc()”.
The most important thing under the game development projects is to run a game loop. For this we will define a UDF named “game_loop()” for this, we will run a for loop for getting the events by using “pygame.event.get()”. Under the “for” block we will check the type of events by the “event. type()” method. Will check for the quit event and keydown event by using “pygame. QUIT” & “pygame. KEYDOWN” respectively because we will press the keys for the movement. Under the keydown event, we will check for the key pressed i.e. left or right by using “pygame.K_LEFT” & “pygame.K_RIGHT”. To show the movement while pressing we will manipulate the coordinate of the user’s car by shifting its x coordinate.
After doing so, we will call all the UDFs under the game loop accordingly. Now, the main logic for our game begins. Let’s code for that. For setting the boundaries of the car movement will use, a use condition according to the car width. The next segment of the code is to get the opponent cars continuously on the window screen, for getting these cars randomly we will make use of random module functions. The last segment of code under this function is to define the car crash logic, we just have to code for this by keeping the width of the cars from the left and right sides in the mind and then we will blit the “CAR CRASHED” message on the screen with the same method. In the end, we will update the screen by “pygame.display.flip()” and to maintain the frames we will use the “.tick()” method.
We will make another UDF named “intro()” to make this game’s introductory window. Under this, we will first load the background image and then blit it. After this will draw two buttons stating “START” &” QUIT” by using the “pygame.draw.rect()” method. For the text to get appeared on that rectangle we will make another UDF named “text()” and with the help of the font object we will follow the same procedure. With the help of “pygame.mouse.get_pos()” we will get the coordinates at which our mouse pointer is present and with the help of that we will show the hover effect on those buttons by drawing another rectangle over them. Now, with the help of “pygame.mouse.get_pressed()” we will come to know the coordinates will the mouse button is pressed, and by using that we will call the “game_loop()” for the start button and “pygame. quit()” for the quit button.
In the end, we will call the intro() and game_loop() functions to run this project successfully.
By following the above-mentioned procedure, you can easily build up a simple car racing game!
Output:
Find More Projects

URL Shortener Using Python Django Introduction:Long URLs can be shortened into short, shareable links with the help of the URL Shortener project. …

User Authentication System Using Python Django Introduction: The implementation of safe and adaptable user authentication in Django is the main goal of …

The E-Learning System using Java with a Graphical User Interface (GUI) Introduction The E-Learning System is developed using Java (with a Graphical …

Weather App Using Python Django Introduction: When a user enters the name of a city, the Weather App retrieves current weather information. …

Quiz App Using Python Django Introduction: Users can take quizzes in a variety of subjects, see their results, and monitor their progress …

resume screener in python using python introduction The hiring process often begins with reviewing numerous resumes to filter out the most suitable …
Get Huge Discounts

More Python Projects
