
Text Detection Using Open CV Python With Source Code
Introduction :
The text detection is a very important task for computer vision, It extract and recognise the information in form of textual from images or video frames. One of the most
commonly cited use-cases for this technology include automating scanning documents and converting them, automatically translating billboards or license plates in real time.
OpenCV, which is an exceedingly powerful open source computer vision library classifying text regions of the image. This typically involves a sequence of steps: pre- processing the image to make text features more salient, localization/segmentation then supposed-text regions in an image followed by refinement of such localized
objects that likely contain human-readable characters. Some of them are edge
detection, contour analysis and usage machine learning models like EAST (Efficient and Accurate Scene Text). All text detected can then be processed by Optical Character
Recognition (OCR) tools, such as Tesseract. Text detection using OpenCV is very
important in many of the image processing applications which follow a more traditional Palaeolithic approach, thus making the text obviously UV to open source geeks.
Required Modules Or Packages :-
You Need The Packages List Given Below :-
- Numpy :- It is a core library for numerical computation in python and it can handle large arrays of numbers.
- cv2 :- It is a library to use in Computer Vision task. You will get basic image processing tools while using cv2 for example, Image Reading and Writing .
- PIL :- This Python Library is Used to Open , Manipulate and Save the Image File Formats .
- Pytesseract :- This Python Libray is Used to Extract Text From Images .
- Time :- This Python library is used to handle time-related tasks , like measuring time intervals, etc.
How To Run The Code :-
Step 1 . First , You Download and Install Visual Studio Code or VS Code In your PC or Laptop by VS Code Official Website .
Step 2 . Now Open CMD As Administrator and install the above packages using pip .
Step 3 . Now Open Visual Studio Code .
Step 4. Now Make The file named as TextSimple.py .
Step 5 . Now Copy And Paste The Code from the Link Given Below
Step 6 . After pasting The code , Save This & Click On Run Button .
Step 7. Now You will See The Output .
Code Explaination :-
This Python code is used to Detect the Texts from Any Image Files format . Step-by-Step Guide Given Below :-
1. Imports:
- Numpy :- It is a core library for numerical computation in python and it can handle large arrays of numbers.
- cv2 :- It is a library to use in Computer Vision task. You will get basic image processing tools while using cv2 for example, Image Reading and Writing .
- PIL :- This Python Library is Used to Open , Manipulate and Save the Image File Formats .
- Pytesseract :- This Python Libray is Used to Extract Text From Images .
- Time :- This Python library is used to handle time-related tasks , like measuring time intervals, etc.
2. Image Reading and Conversion :-
img = cv2.imread(‘1.png’) :- It is Used to Reading the image file ‘1.png’ using OpenCV , Ensure that ‘1.png’ file is Save in Your Directory .
img = cv2.cvtColor(img, cv2.COLOR_BGR2RGB):- It is Used to Converting the image from BGR to RGB Format.
4. Character Detection :-
boxes = pytesseract.image_to_boxes(img) :- It Uses The PyTesseract (Python Library) to detect characters from the image .
5. Processing and Drawing Boxes :- Ensuring correct detections :-
Here, ‘for’ loop will iterate on each line of the output from boxes which looks like character and their bounding box coordinates.
b =b.split(‘ ‘) :- It is Used to split into list character and coordinates for i in range(5):PrintWriter(b[i])
The coordinates (x, y, w and h) of bounding box from list :- x,y,w,h = int(b[1]),int(b[2]),int(b[3],b(4))
cv2. rectangle(img, (x, hImg – y), (w, hImg -h), (50, 50,255 ),2):- It will draw a rectangle around each detected character .
6. Displaying the Image:
cv2. imshow(‘img’, img):- It Opens a window with the image on which we drew rectangles and labels on Detected Text .
cv2. waitKey(0):- It Waits for indefinitely until any key is pressed and image window will be close
Here Is Your Code Link From Where You Can Access or Copy The Code :-
Get Discount on Top Educational Courses
Source Code :
TextMoreExamples.py
					import cv2
import pytesseract
import numpy as np
from PIL import ImageGrab
import time

pytesseract.pytesseract.tesseract_cmd = 'C:\\Program Files\\Tesseract-OCR\\tesseract.exe'
img = cv2.imread('1.png')
img = cv2.cvtColor(img, cv2.COLOR_BGR2RGB)

##############################################
##### Image to String   ######
##############################################
# print(pytesseract.image_to_string(img))

#############################################
#### Detecting Characters  ######
#############################################
hImg, wImg, _ = img.shape
boxes = pytesseract.image_to_boxes(img)
for b in boxes.splitlines():
    print(b)
    b = b.split(' ')
    print(b)
    x, y, w, h = int(b[1]), int(b[2]), int(b[3]), int(b[4])
    cv2.rectangle(img, (x, hImg - y), (w, hImg - h), (50, 50, 255), 2)
    cv2.putText(img, b[0], (x, hImg - y + 25), cv2.FONT_HERSHEY_SIMPLEX, 1, (50, 50, 255), 2)

##############################################
##### Detecting Words  ######
##############################################
# #[   0          1           2           3           4          5         6       7       8        9        10       11 ]
# #['level', 'page_num', 'block_num', 'par_num', 'line_num', 'word_num', 'left', 'top', 'width', 'height', 'conf', 'text']
# boxes = pytesseract.image_to_data(img)
# for a, b in enumerate(boxes.splitlines()):
#     print(b)
#     if a != 0:
#         b = b.split()
#         if len(b) == 12:
#             x, y, w, h = int(b[6]), int(b[7]), int(b[8]), int(b[9])
#             cv2.putText(img, b[11], (x, y - 5), cv2.FONT_HERSHEY_SIMPLEX, 1, (50, 50, 255), 2)
#             cv2.rectangle(img, (x, y), (x + w, y + h), (50, 50, 255), 2)

##############################################
##### Detecting ONLY Digits  ######
##############################################
# hImg, wImg, _ = img.shape
# conf = r'--oem 3 --psm 6 outputbase digits'
# boxes = pytesseract.image_to_boxes(img, config=conf)
# for b in boxes.splitlines():
#     print(b)
#     b = b.split(' ')
#     print(b)
#     x, y, w, h = int(b[1]), int(b[2]), int(b[3]), int(b[4])
#     cv2.rectangle(img, (x, hImg - y), (w, hImg - h), (50, 50, 255), 2)
#     cv2.putText(img, b[0], (x, hImg - y + 25), cv2.FONT_HERSHEY_SIMPLEX, 1, (50, 50, 255), 2)

##############################################
##### Webcam and Screen Capture Example ######
##############################################
# cap = cv2.VideoCapture(0)
# cap.set(3, 640)
# cap.set(4, 480)
# def captureScreen(bbox=(300, 300, 1500, 1000)):
#     capScr = np.array(ImageGrab.grab(bbox))
#     capScr = cv2.cvtColor(capScr, cv2.COLOR_RGB2BGR)
#     return capScr
# while True:
#     timer = cv2.getTickCount()
#     _, img = cap.read()
#     # img = captureScreen()
#     # DETECTING CHARACTERS
#     hImg, wImg, _ = img.shape
#     boxes = pytesseract.image_to_boxes(img)
#     for b in boxes.splitlines():
#         # print(b)
#         b = b.split(' ')
#         # print(b)
#         x, y, w, h = int(b[1]), int(b[2]), int(b[3]), int(b[4])
#         cv2.rectangle(img, (x, hImg - y), (w, hImg - h), (50, 50, 255), 2)
#         cv2.putText(img, b[0], (x, hImg - y + 25), cv2.FONT_HERSHEY_SIMPLEX, 1, (50, 50, 255), 2)
#     fps = cv2.getTickFrequency() / (cv2.getTickCount() - timer)
#     # cv2.putText(img, str(int(fps)), (75, 40), cv2.FONT_HERSHEY_SIMPLEX, 0.7, (20, 230, 20), 2)
#     cv2.imshow("Result", img)
#     cv2.waitKey(1)

cv2.imshow('img', img)
cv2.waitKey(0)
TextSimple.py
					import cv2
import pytesseract
import numpy as np
from PIL import ImageGrab
import time


pytesseract.pytesseract.tesseract_cmd = 'C:\\Program Files\\Tesseract-OCR\\tesseract.exe'
img = cv2.imread('1.png')
img = cv2.cvtColor(img, cv2.COLOR_BGR2RGB)

#############################################
#### Detecting Characters  ######
#############################################
hImg, wImg,_ = img.shape
boxes = pytesseract.image_to_boxes(img)
for b in boxes.splitlines():
    print(b)
    b = b.split(' ')
    print(b)
    x, y, w, h = int(b[1]), int(b[2]), int(b[3]), int(b[4])
    cv2.rectangle(img, (x,hImg- y), (w,hImg- h), (50, 50, 255), 2)
    cv2.putText(img,b[0],(x,hImg- y+25),cv2.FONT_HERSHEY_SIMPLEX,1,(50,50,255),2)


cv2.imshow('img', img)
cv2.waitKey(0)
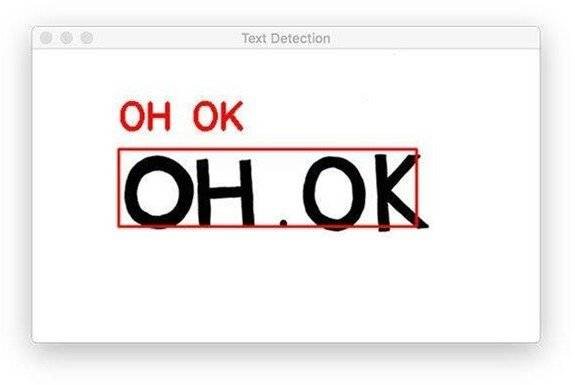
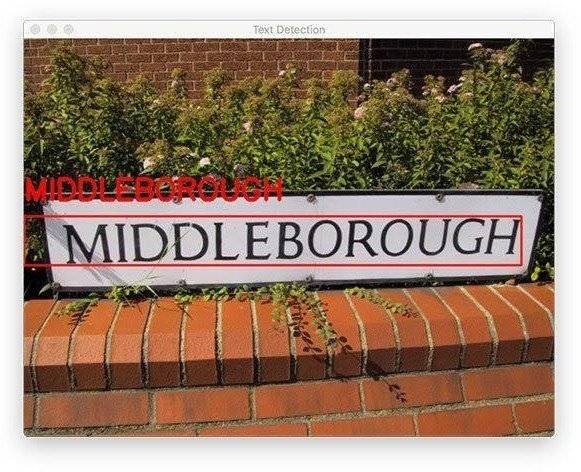
Output :
Find More Projects

URL Shortener Using Python Django Introduction: Long URLs can be shortened into short, shareable links with the help of the URL Shortener …

User Authentication System Using Python Django Introduction: The implementation of safe and adaptable user authentication in Django is the main goal of …

The E-Learning System using Java with a Graphical User Interface (GUI) Introduction The E-Learning System is developed using Java (with a Graphical …

Weather App Using Python Django Introduction: When a user enters the name of a city, the Weather App retrieves current weather information. …

Quiz App Using Python Django Introduction: Users can take quizzes in a variety of subjects, see their results, and monitor their progress …

resume screener in python using python introduction The hiring process often begins with reviewing numerous resumes to filter out the most suitable …
Get Huge Discounts

More Python Projects
