
Shape Detection Using Open CV Python With Source Code
Introduction :
Real-time shape detection is a specific kind of cognitive when the system must recognize and identify geometric shapes in live video feeds using OpenCV. One of
OpenCV, the computer vision library which we use is capable of detecting shapes in images or video streams and tweets about mission progress. This is usually done by sampling frames from a video feed, converting the image to grayscale and applying edge detection (i.e. using Canny or thresholding). After detecting the edges, then extracting contours and analyzing them to analyze what kind of shape it is. Shape recognition in real time is primarily demanded within the industries of drone, robot picking through shape detection system and AR application. When we utilize the powerful processing capabilities in OpenCV, developers are able to design systems that can detect shapes but also track and respond to them within changing environments making it a highly
useful tool across our technologies today.
Language And Interface :-
Shape Detection Using Python , A Versatile Programming Language With Source Code .
Required Modules Or Packages :-
You Need The Packages List Given Below :-
- Numpy :- It is a core library for numerical computation in python and it can handle large arrays of numbers.
- cv2 :- It is a library to use in Computer Vision You will get basic image processing tools while using cv2 for example, Image Reading and Writing
How To Run The Code :-
Step 1 . First , You Download and Install Visual Studio Code or VS Code In your PC or Laptop by VS Code Official Website .
Step 2 . Now Open CMD As Administrator and install the above packages using pip .
Step 3 . Now Open Visual Studio Code .
Step 4. Now Make The file named as shapedetection.py .
Step 5 . Now Copy And Paste The Code from the Link Given Below
Step 6 . After pasting The code , Save This & Click On Run Button .
Step 7 . Now You will See The Output .
Code Explanation :-
This Python code is used to Detect the Shapes like Rectangle , Triangle , Circle , etc. from Any Image Files format . Step-by-Step Guide Given Below :-
Imports:
- Numpy :- It is a core library for numerical computation in python and it can handle large arrays of numbers.
- cv2 :- It is a library to use in Computer Vision You will get basic image processing tools while using cv2 for example, Image Reading and Writing
Setup :
cv2.VideoCapture(0):- It is used to initialize the webcam and setting the frame’s width and height .
cv2.set :- It is used to set The Dimensions of frame . Trackbars for Parameters:
To take parameters dynamically, three trackbars(“Threshold1”, “Threshold2” and “Area”) are created in a window named “Parameters”. This will let us dynamically tweak the Canny edge detection thresholds and how much minimum area a contour must have to be detected.
Image Stacking Function :
StackImages, This function allows a user to arrange multiple images into one display grid. It checks whether the input is a list of lists (multiple rows) or single one, and scales images according to size available. Also it ensures that grayscale image is converted to BGR for display.
Contour Detection:
The next function is the getContours which would iterate over all of the detected edges. It finds contours using cv2. findContours, while filtering out those boxes with too small an area, and then drawing them on a copy of the original image. It approximates each contour to the polygon (approx = cv. Drawing around them: Now the next step in our process is approxPolyDP and Drawing a bounding rectangle — It also adds some text indicating the number of vertices (i.e., points) in each contour and on screen, as well the area of that contour.
Main Loop :
The program runs with this in the background, reading frames from the webcam at each iteration. Again, each frame is blurred and converted to gray before being Canny edge detected with adaptive thresholds. The edges detected are then dilated to boost the contours. Then we extract contours, and draw these contours on the image. Results are arranged using the stackImages function inside a window with name ‘Result’
Get Discount on Top Educational Courses
Source Code :-
RealTime_Shape_Detection_Contours.py
					import cv2
import numpy as np

frameWidth = 640
frameHeight = 480
cap = cv2.VideoCapture(0)
cap.set(3, frameWidth)
cap.set(4, frameHeight)

def empty(a):
    pass

cv2.namedWindow("Parameters")
cv2.resizeWindow("Parameters", 640, 240)
cv2.createTrackbar("Threshold1", "Parameters", 23, 255, empty)
cv2.createTrackbar("Threshold2", "Parameters", 20, 255, empty)
cv2.createTrackbar("Area", "Parameters", 5000, 30000, empty)

def stackImages(scale, imgArray):
    rows = len(imgArray)
    cols = len(imgArray[0])
    rowsAvailable = isinstance(imgArray[0], list)
    width = imgArray[0][0].shape[1]
    height = imgArray[0][0].shape[0]
    if rowsAvailable:
        for x in range(0, rows):
            for y in range(0, cols):
                if imgArray[x][y].shape[:2] == imgArray[0][0].shape[:2]:
                    imgArray[x][y] = cv2.resize(imgArray[x][y], (0, 0), None, scale, scale)
                else:
                    imgArray[x][y] = cv2.resize(imgArray[x][y],
                                                 (imgArray[0][0].shape[1], imgArray[0][0].shape[0]),
                                                 None, scale, scale)
                if len(imgArray[x][y].shape) == 2:
                    imgArray[x][y] = cv2.cvtColor(imgArray[x][y], cv2.COLOR_GRAY2BGR)
        imageBlank = np.zeros((height, width, 3), np.uint8)
        hor = [imageBlank] * rows
        hor_con = [imageBlank] * rows
        for x in range(0, rows):
            hor[x] = np.hstack(imgArray[x])
        ver = np.vstack(hor)
    else:
        for x in range(0, rows):
            if imgArray[x].shape[:2] == imgArray[0].shape[:2]:
                imgArray[x] = cv2.resize(imgArray[x], (0, 0), None, scale, scale)
            else:
                imgArray[x] = cv2.resize(imgArray[x],
                                         (imgArray[0].shape[1], imgArray[0].shape[0]),
                                         None, scale, scale)
            if len(imgArray[x].shape) == 2:
                imgArray[x] = cv2.cvtColor(imgArray[x], cv2.COLOR_GRAY2BGR)
        hor = np.hstack(imgArray)
        ver = hor
    return ver

def getContours(img, imgContour):
    contours, hierarchy = cv2.findContours(img, cv2.RETR_EXTERNAL, cv2.CHAIN_APPROX_NONE)
    for cnt in contours:
        area = cv2.contourArea(cnt)
        areaMin = cv2.getTrackbarPos("Area", "Parameters")
        if area > areaMin:
            cv2.drawContours(imgContour, cnt, -1, (255, 0, 255), 7)
            peri = cv2.arcLength(cnt, True)
            approx = cv2.approxPolyDP(cnt, 0.02 * peri, True)
            print(len(approx))
            x, y, w, h = cv2.boundingRect(approx)
            cv2.rectangle(imgContour, (x, y), (x + w, y + h), (0, 255, 0), 5)
            cv2.putText(imgContour, "Points: " + str(len(approx)), (x + w + 20, y + 20),
                        cv2.FONT_HERSHEY_COMPLEX, .7, (0, 255, 0), 2)
            cv2.putText(imgContour, "Area: " + str(int(area)), (x + w + 20, y + 45),
                        cv2.FONT_HERSHEY_COMPLEX, 0.7, (0, 255, 0), 2)

while True:
    success, img = cap.read()
    imgContour = img.copy()
    imgBlur = cv2.GaussianBlur(img, (7, 7), 1)
    imgGray = cv2.cvtColor(imgBlur, cv2.COLOR_BGR2GRAY)
    threshold1 = cv2.getTrackbarPos("Threshold1", "Parameters")
    threshold2 = cv2.getTrackbarPos("Threshold2", "Parameters")
    imgCanny = cv2.Canny(imgGray, threshold1, threshold2)
    kernel = np.ones((5, 5))
    imgDil = cv2.dilate(imgCanny, kernel, iterations=1)
    getContours(imgDil, imgContour)
    imgStack = stackImages(0.8, ([img, imgCanny], [imgDil, imgContour]))
    cv2.imshow("Result", imgStack)
    if cv2.waitKey(1) & 0xFF == ord('q'):
        break
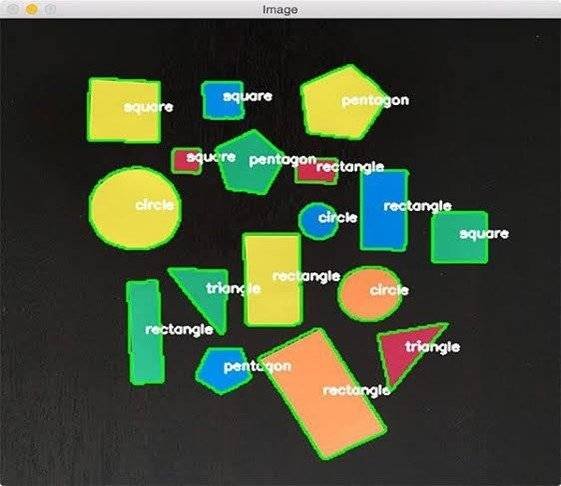
Output :
After Running the Code , You Will See The Output Like This .
Find More Projects

URL Shortener Using Python Django Introduction: Long URLs can be shortened into short, shareable links with the help of the URL Shortener …

User Authentication System Using Python Django Introduction: The implementation of safe and adaptable user authentication in Django is the main goal of …

The E-Learning System using Java with a Graphical User Interface (GUI) Introduction The E-Learning System is developed using Java (with a Graphical …

Weather App Using Python Django Introduction: When a user enters the name of a city, the Weather App retrieves current weather information. …

Quiz App Using Python Django Introduction: Users can take quizzes in a variety of subjects, see their results, and monitor their progress …

resume screener in python using python introduction The hiring process often begins with reviewing numerous resumes to filter out the most suitable …
Get Huge Discounts

More Python Projects
