handwritten digit recognizer in python
introduction
In an era where artificial intelligence and deep learning are transforming industries, real-time visual recognition has become one of the most fascinating applications of machine learning. The Handwritten Digit Recognizer in python is a classic example of image classification powered by deep learning, which is commonly taught using the MNIST dataset — a benchmark dataset of 28×28 grayscale images of handwritten digits from 0 to 9.
This project demonstrates how artificial intelligence can be integrated into graphical user interfaces (GUIs) using Python’s Tkinter library, allowing users to draw their own digits and get real-time predictions through a pre-trained convolutional neural network (CNN) model.
Purpose of the Application
The main goal of this project is to allow users to interactively draw digits on a canvas, and have a machine learning model recognize and classify the drawn digit accurately. It combines three core components of modern computing:
User Interaction (GUI via Tkinter)
Image Processing (via Pillow & NumPy)
Deep Learning Prediction (via TensorFlow/Keras CNN)
This project bridges the gap between user-friendly desktop applications and powerful backend intelligence, giving an intuitive feel of how machine learning works behind the scenes.
Why is this Project Important?
Helps learners understand how deep learning models like CNNs operate.
Demonstrates end-to-end integration: from drawing input to model inference.
Provides a foundation for real-world AI applications such as:
Optical Character Recognition (OCR)
Signature verification
License plate recognition
Smart drawing pads and AI-powered note apps
How It Works
The user draws a digit using the mouse on a canvas.
The canvas drawing is simultaneously stored in an image buffer.
On clicking “Predict”, the app:
Resizes the image to
28x28Inverts the background to match MNIST format
Normalizes pixel data
Passes it to the trained CNN model
Predicts the digit with high accuracy
The predicted digit is displayed instantly in the interface.
Technical Highlights
GUI Framework: Built using
Tkinter, Python’s standard GUI library.Image Drawing: Implemented using
PIL (Pillow)to handle canvas rendering.Prediction Logic: Uses a Keras CNN model trained on the MNIST dataset and saved as
mnist_model.h5.Error Handling: Includes safe loading of models and fallback in case of issues (e.g., missing file, invalid image).
Ideal For:
Students learning computer vision or neural networks.
Developers building intelligent GUI applications.
Educators demonstrating deep learning in an interactive way.
Hobbyists and AI enthusiasts exploring fun projects with real-time inference.
steps to create handwritten digit recognizer in python
Step 1: Set Up Your Environment
✅ Install Python (if not already installed)
Download from https://www.python.org✅ Install Required Libraries via terminal or Jupyter:
pip install tensorflow pillow numpy
Step 2: Train and Save the CNN Model (one-time step)
If you don’t already have a model (mnist_model.h5), train one using this code:
from tensorflow.keras.datasets import mnist
from tensorflow.keras.models import Sequential
from tensorflow.keras.layers import Dense, Flatten, Conv2D, MaxPooling2D
from tensorflow.keras.utils import to_categorical

# Load dataset
(x_train, y_train), (x_test, y_test) = mnist.load_data()

# Preprocess
x_train = x_train.reshape(-1, 28, 28, 1) / 255.0
x_test = x_test.reshape(-1, 28, 28, 1) / 255.0
y_train = to_categorical(y_train)
y_test = to_categorical(y_test)

# Model
model = Sequential([
    Conv2D(32, kernel_size=3, activation='relu', input_shape=(28, 28, 1)),
    MaxPooling2D(),
    Flatten(),
    Dense(128, activation='relu'),
    Dense(10, activation='softmax')
])
model.compile(optimizer='adam', loss='categorical_crossentropy', metrics=['accuracy'])

# Train
model.fit(x_train, y_train, epochs=5, validation_split=0.1)

# Save model
model.save("mnist_model.h5")
Step 3: Create the GUI App
Open a new Python file (e.g.,
digit_gui.py)Paste the following GUI code:
import tkinter as tk
import PIL
from PIL import Image, ImageDraw, ImageOps
import numpy as np
import os
# Load model
model_path = "mnist_model.h5"
if not os.path.exists(model_path):
print("Model not found.")
model = None
else:
from tensorflow.keras.models import load_model
model = load_model(model_path)
class App(tk.Tk):
def __init__(self):
super().__init__()
self.title("Handwritten Digit Recognizer")
self.geometry("400x400")
self.canvas = tk.Canvas(self, width=280, height=280, bg="white")
self.canvas.pack(pady=10)
self.button_frame = tk.Frame(self)
self.button_frame.pack()
tk.Button(self.button_frame, text="Predict", command=self.predict).grid(row=0, column=0, padx=10)
tk.Button(self.button_frame, text="Clear", command=self.clear).grid(row=0, column=1, padx=10)
self.result_label = tk.Label(self, text="", font=("Arial", 16))
self.result_label.pack(pady=10)
self.image = PIL.Image.new("L", (280, 280), 255)
self.draw = ImageDraw.Draw(self.image)
self.canvas.bind("<B1-Motion>", self.paint)
def paint(self, event):
x, y = event.x, event.y
self.canvas.create_oval(x-8, y-8, x+8, y+8, fill="black")
self.draw.ellipse((x-8, y-8, x+8, y+8), fill=0)
def clear(self):
self.canvas.delete("all")
self.image = PIL.Image.new("L", (280, 280), 255)
self.draw = ImageDraw.Draw(self.image)
self.result_label.config(text="")
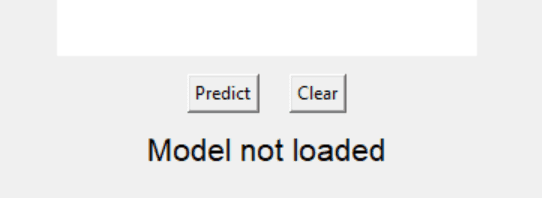
def predict(self):
if model is None:
self.result_label.config(text="Model not loaded")
return
try:
img = self.image.resize((28, 28))
img = ImageOps.invert(img)
img = np.array(img) / 255.0
img = img.reshape(1, 28, 28, 1)
prediction = model.predict(img, verbose=0)
digit = np.argmax(prediction)
self.result_label.config(text=f"Predicted Digit: {digit}")
except Exception as e:
self.result_label.config(text=f"Error: {str(e)}")
if __name__ == "__main__":
app = App()
app.mainloop()
Step 4: Run the Application
Run the file:
python digit_gui.py
Draw a digit (0–9) on the canvas using your mouse.
Click “Predict” to see the predicted number.
Click “Clear” to reset the canvas.
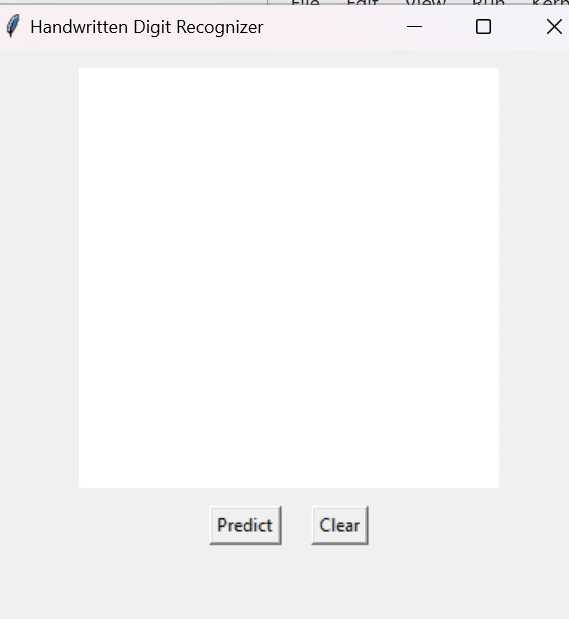
Output
Simple white canvas to draw with the mouse.
Real-time prediction shown in a label.
Works with trained CNN model saved as
mnist_model.h5.
code explanation
1. Imports
import tkinter as tk
import PIL
from PIL import Image, ImageDraw, ImageOps
import numpy as np
import os
tkinter: GUI creation.PIL (Pillow): Image creation, manipulation, inversion.numpy: To reshape and normalize image array.os: For checking if model file exists.
2. Check for Model File
model_path = "mnist_model.h5"
if not os.path.exists(model_path):
    ...
Verifies that the saved trained model exists.
If missing: avoids importing TensorFlow (saves resources), sets
model = None.If present: loads it using
load_model()from Keras.
3. App Class – GUI Creation
class App(tk.Tk):
    def __init__(self):
        ...
This class creates the main app window and sets up widgets.
Inside __init__():
Window title & size set.
A
Canvaswidget (280x280) where users draw the digit.A
Framecontaining two buttons:Predict – runs prediction.
Clear – clears canvas and resets image.
A
Labelto show prediction result.Creates a Pillow Image (
self.image) in grayscale modeL, initialized with white (255).Binds mouse drag event to
paint()method for drawing.
4. Drawing on Canvas
def paint(self, event):
    ...
Uses mouse coordinates to draw black-filled ovals (
8pxradius) on the canvas.Simultaneously draws on the Pillow
ImageusingImageDraw.
5. Clear Button Function
def clear(self):
    ...
Clears the canvas and resets the
self.imageandself.drawobjects.Clears the result label.
6. Predict Button Function
def predict(self):
    ...
Safeguard: If
model is None, display error message.Steps:
Resize image to
28x28(MNIST format).Invert the image (black background becomes white).
Normalize pixel values (0 to 1).
Reshape to
(1, 28, 28, 1)to match CNN input shape.Pass to the model using
model.predict()(withverbose=0).Get prediction label using
np.argmax().Show result in
result_label.
Error Handling is used to catch any exception and display it.
7. Main Execution Block
if __name__ == "__main__":
    app = App()
    app.mainloop()
Initializes and runs the GUI loop only if the script is executed directly.
Key Features
Clean and minimalistic Tkinter GUI.
Draw your own digit and predict in real-time.
Handles model loading errors and prediction exceptions gracefully.
Compatible with any
mnist_model.h5CNN trained on MNIST.
Requirements
tensorfloworkeraspillownumpyTrained model saved as:
mnist_model.h5
source code
					import tkinter as tk
import PIL
from PIL import Image, ImageDraw, ImageOps
import numpy as np
import os

# Check if model file exists before importing TensorFlow
model_path = "mnist_model.h5"
if not os.path.exists(model_path):
    print(f"Error: Model file '{model_path}' not found. Please check the path.")
    # You could create a placeholder model or exit gracefully here
    model = None
else:
    # Import TensorFlow only if model exists to avoid unnecessary loading
    from tensorflow.keras.models import load_model
    try:
        # Load pre-trained model with a timeout or error handling
        model = load_model(model_path)
        print("Model loaded successfully")
    except Exception as e:
        print(f"Error loading model: {e}")
        model = None

class App(tk.Tk):
    def __init__(self):
        super().__init__()
        self.title("Handwritten Digit Recognizer")
        self.geometry("400x400")
        self.canvas = tk.Canvas(self, width=280, height=280, bg="white")
        self.canvas.pack(pady=10)
        self.button_frame = tk.Frame(self)
        self.button_frame.pack()

        self.predict_btn = tk.Button(self.button_frame, text="Predict", command=self.predict)
        self.predict_btn.grid(row=0, column=0, padx=10)

        self.clear_btn = tk.Button(self.button_frame, text="Clear", command=self.clear)
        self.clear_btn.grid(row=0, column=1, padx=10)

        self.result_label = tk.Label(self, text="", font=("Arial", 16))
        self.result_label.pack(pady=10)

        self.image = PIL.Image.new("L", (280, 280), 255)
        self.draw = ImageDraw.Draw(self.image)

        self.canvas.bind("", self.paint)

    def paint(self, event):
        x, y = event.x, event.y
        self.canvas.create_oval(x-8, y-8, x+8, y+8, fill="black")
        self.draw.ellipse((x-8, y-8, x+8, y+8), fill=0)

    def clear(self):
        self.canvas.delete("all")
        self.image = PIL.Image.new("L", (280, 280), 255)  # Create a new image instead of drawing rectangle
        self.draw = ImageDraw.Draw(self.image)  # Create a new ImageDraw object
        self.result_label.config(text="")

    def predict(self):
        if model is None:
            self.result_label.config(text="Model not loaded")
            return

        try:
            # Add error handling for prediction
            img = self.image.resize((28, 28))
            img = ImageOps.invert(img)
            img = np.array(img) / 255.0
            img = img.reshape(1, 28, 28, 1)  # Add channel dimension for CNN models

            # Use a timeout for prediction to avoid hanging
            prediction = model.predict(img, verbose=0)  # Set verbose=0 to reduce output
            digit = np.argmax(prediction)
            self.result_label.config(text=f"Predicted Digit: {digit}")
        except Exception as e:
            self.result_label.config(text=f"Error: {str(e)}")

# Run App
if __name__ == "__main__":
    app = App()
    app.mainloop()
output
Get Huge Discounts