Graphical User Interface Calendar using python With Source Code
Introduction:
A calendar is used in our daily life. Here we will build a GUI(graphical user interface) Calendar project in python using a python module called Tkinter. Tkinter is a python module to create GUI applications. It is a great tool to build python applications.
This calendar is created with the calendar and the Tkinter module. you need to install both the calendar and the Tkinter module.
Requirements:
- For writing code, there must be a text editor on your pc (any text editor).
- There must be a python install in your system
- You must have python basic knowledge
That’s you’re ready to go
Let’s Start:
- Create a new file with any name you like
- Open that file with a text editor of your choice. We are using vs code.
- Now create a folder with calendar.py (you can use any name you like just add .py at the end)
- Now programming and programming logic begins (Final Code)
Source Code:
Get Discount on Top Educational Courses
					import calendar
from tkinter import *

# Codewithcurious.com/projects
def showCalender():
    gui = Tk()
    gui.config(background='white')
    gui.title("Calender")
    gui.geometry("550x600")
    year = int(year_field.get())
    gui_content = calendar.calendar(year)
    calYear = Label(gui, text=gui_content, font="Consolas 10 bold")
    calYear.grid(row=4, column=1, padx=20)
    gui.mainloop()


if __name__ == '__main__':
    new = Tk()
    new.config(background='saddle brown')
    new.title("Calender")
    new.geometry("500x500")

    cal = Label(new, text="Calender", bg="saddle brown",
                fg="bisque", font=("times", 28, "bold"))
    cal.grid(row=1, column=1)

    year = Label(new, text="Enter Year", bg="saddle brown",
                 fg="bisque", font=("times", 20))
    year.grid(row=2, column=1)

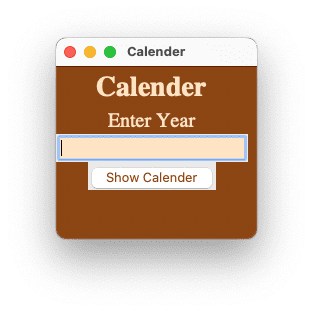
    year_field = Entry(new, bg="bisque",)
    year_field.grid(row=3, column=1)

    button = Button(new, text="Show Calender", fg="saddle brown",
                    bg="bisque", command=showCalender)
    button.grid(row=4, column=1)

    new.mainloop()
Explanation:
- First, we import all the important libraries and modules
- Next, we have to use the Tkinter module to create our application GUI
- Then we created a showcalendar() function to take input to show the calendar of the entered year
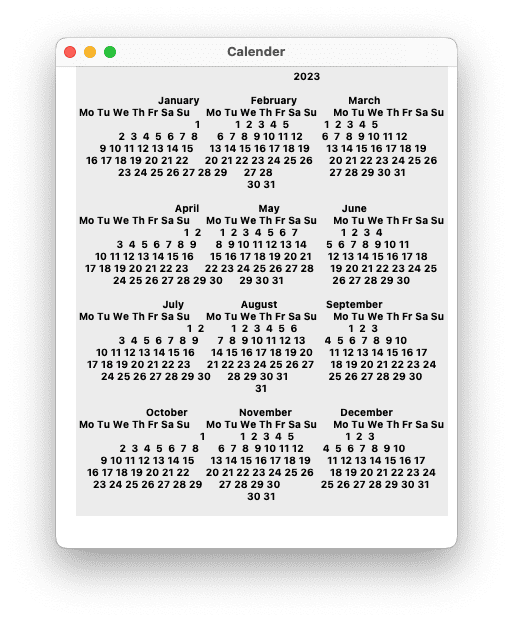
- Then we created the next window to show our calendar by dates, days, and months
- Then we define the window size, font, and color.
That’s it your calendar is ready.
Keep visiting codewithcurious.com for more such projects.
Output:
Find More Projects
URL Shortener Using Python Django Introduction: Long URLs can be shortened into short, shareable links with the help of the URL Shortener …
User Authentication System Using Python Django Introduction: The implementation of safe and adaptable user authentication in Django is the main goal of …
The E-Learning System using Java with a Graphical User Interface (GUI) Introduction The E-Learning System is developed using Java (with a Graphical …
Weather App Using Python Django Introduction: When a user enters the name of a city, the Weather App retrieves current weather information. …
Quiz App Using Python Django Introduction: Users can take quizzes in a variety of subjects, see their results, and monitor their progress …
resume screener in python using python introduction The hiring process often begins with reviewing numerous resumes to filter out the most suitable …


