Generate QR code Using python with Source Code

Introduction :
The QR Code Generator project is a user-friendly Python application that leverages the power of GUI programming and QR code generation to create a seamless and interactive experience. With this project, users can effortlessly input website URLs and promptly generate QR codes for them. The GUI interface is built using the tkinter library, providing a visually appealing and intuitive platform for users to interact with.
tkinter, Python’s standard GUI library, serves as the foundation for crafting the graphical interface. This library enables developers to design windows, buttons, text entry fields, and labels in a straightforward manner, enhancing user accessibility. Through a combination of labels, entry widgets, and buttons, users are guided to input the desired website URL, subsequently initiating the QR code generation process.
For the core functionality of generating QR codes, the project utilizes the qrcode library. This library empowers developers to seamlessly create QR codes from provided data, supporting various customization options such as error correction, box size, and border configuration. By integrating this library, the application transforms user-entered URLs into QR code images, which are then visually displayed within the interface.
The project also integrates the Pillow library, often referred to as PIL, which enhances the compatibility of the generated QR code images with the tkinter GUI. This ensures that the QR codes are seamlessly displayed within the interface, maintaining the quality and accuracy of the generated images.
Source Code :
Get Discount on Top Educational Courses
					import tkinter as tk
import qrcode
from PIL import Image, ImageTk

class QRCodeGeneratorApp:
    def __init__(self, root):
        self.root = root
        self.root.title("QR Code Generator")

        self.url_label = tk.Label(root, text="Enter Website URL:")
        self.url_label.pack()

        self.url_entry = tk.Entry(root)
        self.url_entry.pack()

        self.generate_button = tk.Button(root, text="Generate", command=self.generate_qr_code)
        self.generate_button.pack()

        self.qr_code_label = tk.Label(root)
        self.qr_code_label.pack()

    def generate_qr_code(self):
        url = self.url_entry.get()
        if url:
            qr = qrcode.QRCode(
                version=1,
                error_correction=qrcode.constants.ERROR_CORRECT_L,
                box_size=10,
                border=4,
            )
            qr.add_data(url)
            qr.make(fit=True)
            qr_image = qr.make_image(fill_color="black", back_color="white")

            # Convert the QR code image to a format compatible with tkinter
            qr_photo = ImageTk.PhotoImage(qr_image)

            self.qr_code_label.config(image=qr_photo)
            self.qr_code_label.image = qr_photo
        else:
            self.qr_code_label.config(text="Please enter a valid URL.")

if __name__ == "__main__":
    root = tk.Tk()
    app = QRCodeGeneratorApp(root)
    root.mainloop()
Explanation:
Importing Libraries: The code starts by importing the necessary libraries:
tkinterfor creating the GUI,qrcodefor generating QR codes, andPIL(Python Imaging Library) for working with images.Class Definition: The
QRCodeGeneratorAppclass is defined. It’s responsible for creating the GUI and handling QR code generation.Initializing the GUI: In the constructor (
__init__) of theQRCodeGeneratorAppclass, the GUI components are initialized:url_label: A label that displays “Enter Website URL:” to guide the user.url_entry: An entry widget where the user can input the website URL.generate_button: A button labeled “Generate” that the user clicks to generate the QR code.qr_code_label: An initially empty label where the generated QR code image will be displayed.
Generating QR Code: The
generate_qr_codemethod is responsible for generating and displaying the QR code. When the “Generate” button is clicked, this method is called.- The URL entered in the
url_entrywidget is retrieved. - If a valid URL is entered:
- An instance of the
qrcode.QRCodeclass is created with various configuration options such as version, error correction level, box size, and border. - The URL data is added to the QR code.
- The QR code image is generated using the
makemethod. - The QR code image is converted to a format compatible with
tkinterusingImageTk.PhotoImage. - The
qr_code_labelis updated to display the generated QR code image.
- An instance of the
- If no URL is entered, an error message is displayed in the
qr_code_label.
- The URL entered in the
Main Execution: The
if __name__ == "__main__":block ensures that the code is only executed when the script is run directly (not imported as a module).- An instance of the
tk.Tkclass is created to initialize the main GUI window. - An instance of the
QRCodeGeneratorAppclass is created, passing in the root window. - The
root.mainloop()call starts the GUI event loop, allowing user interactions.
- An instance of the
Steps to Run Above Code:
To run the code provided in the previous responses, you’ll need to install the required modules. Here’s how you can do that:
Install
tkinter(Python’s standard GUI library):tkinteris usually included with Python installations, especially on platforms like Windows and macOS. You can check if it’s available by opening a terminal or command prompt and typing:python -m tkinterIf you don’t get any errors,
tkinteris already installed.Install
qrcodeandPIL(Python Imaging Library):You can install both the
qrcodelibrary and thePILlibrary (which is often installed asPillowfor compatibility) using the following command:pip install qrcode[pil]This command will install both the
qrcodelibrary and its required dependencies, including thePILlibrary (Pillow).Run the Python Program:
After installing the required modules, save the code from the previous responses into a
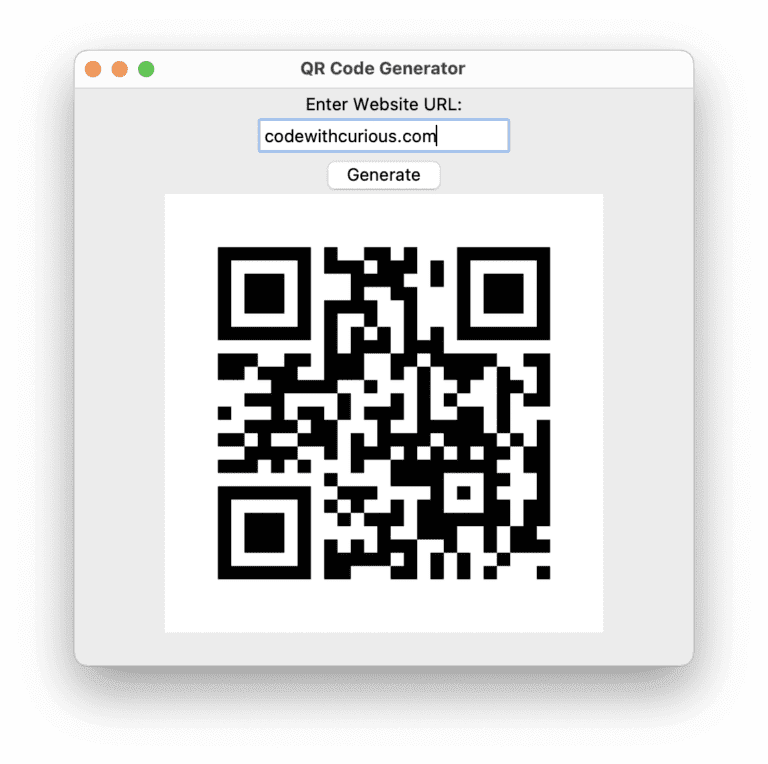
.pyfile (for example,qrcode_generator.py). Then, open a terminal or command prompt, navigate to the directory where you saved the file, and run it using the command:python qrcode_generator.pyThis should open a GUI window where you can input a website URL and generate QR codes
Output :

Find More Projects
URL Shortener Using Python Django Introduction: Long URLs can be shortened into short, shareable links with the help of the URL Shortener …
User Authentication System Using Python Django Introduction: The implementation of safe and adaptable user authentication in Django is the main goal of …
The E-Learning System using Java with a Graphical User Interface (GUI) Introduction The E-Learning System is developed using Java (with a Graphical …
Weather App Using Python Django Introduction: When a user enters the name of a city, the Weather App retrieves current weather information. …
Quiz App Using Python Django Introduction: Users can take quizzes in a variety of subjects, see their results, and monitor their progress …
resume screener in python using python introduction The hiring process often begins with reviewing numerous resumes to filter out the most suitable …


